MFA, Boston--Quilts and Color: The Pilgrim/Roy Collection, Part 2

by Judy Tucker


Here is Part 2 of my visit to the Museum of Fine Arts, Boston, quilt exhibit, "Quilts and Color: The Pilgrim/Roy Collection."

The next room in the exhibit had quilts with "Optical Illusions."

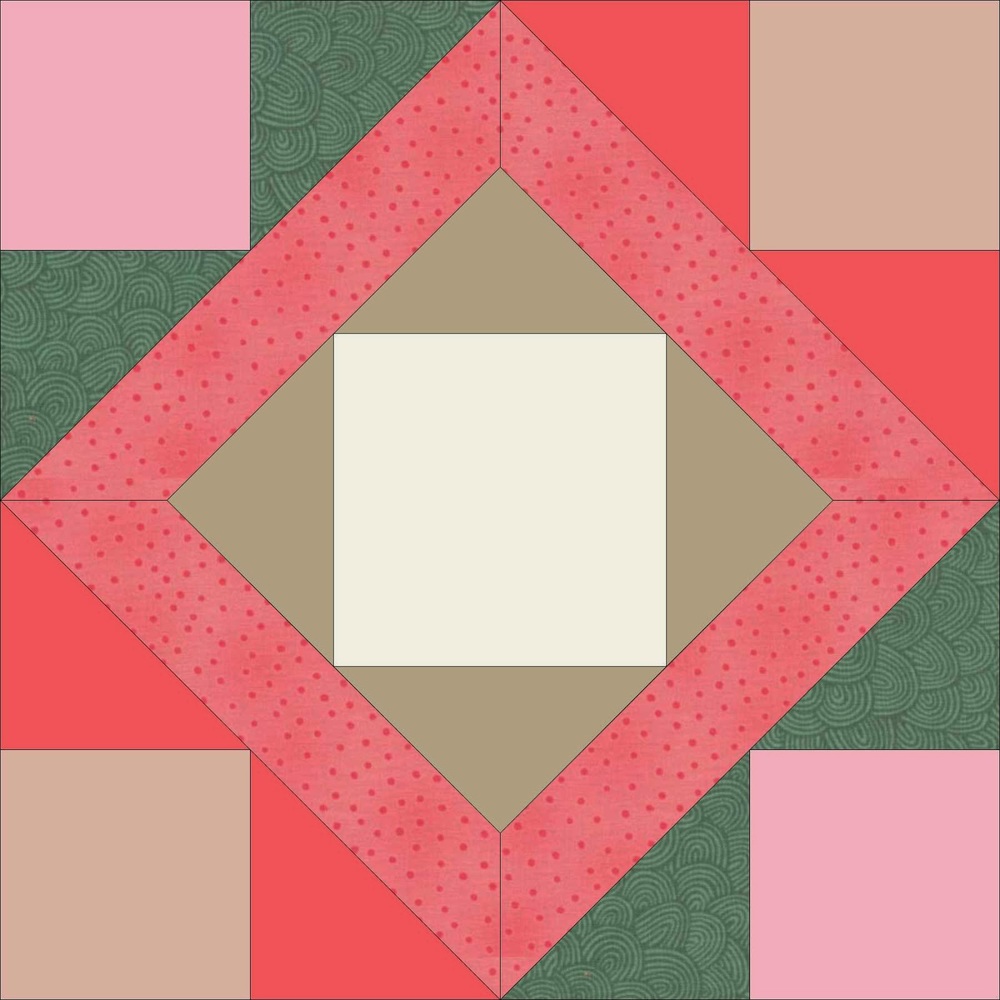
Here is an Economy Block quilt.  At the moment, it is a very popular quilt design in the quilting blog community and the current Modern Quilt movement. 
This quilt is from Pennsylvania, made in the 1870s.

Economy Patch


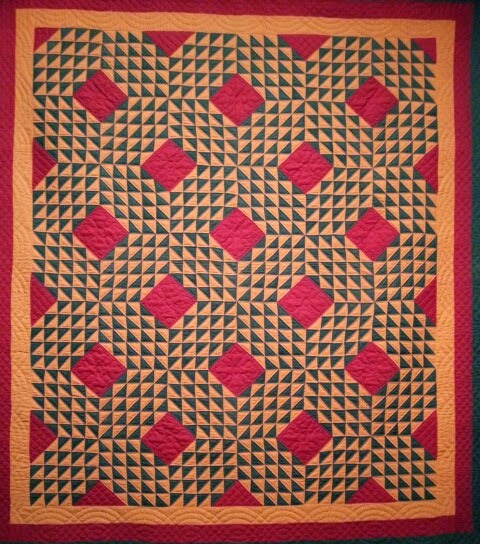
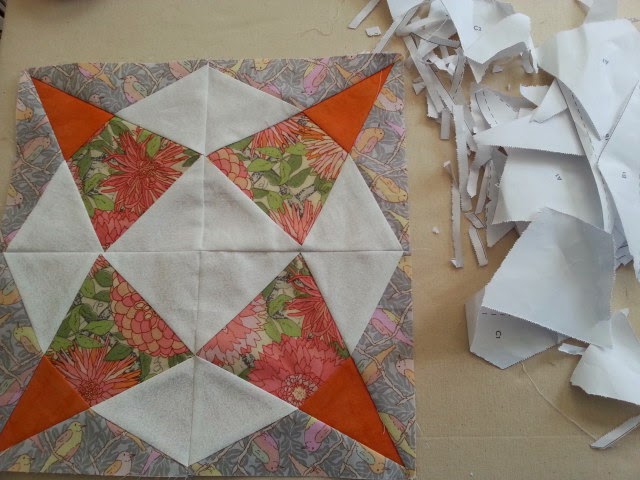
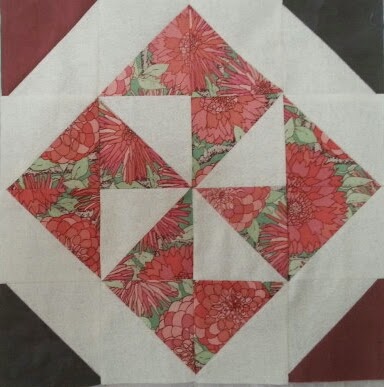
This amazing Orange Peel quilt was made in Pennsylvania in the 1880s or 1890s.
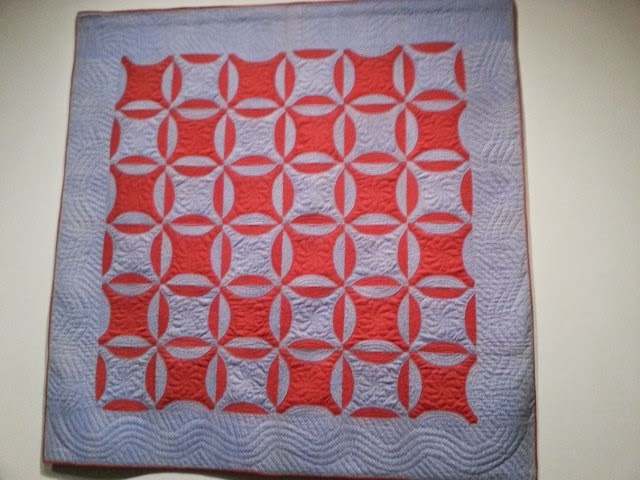
Orange Peel

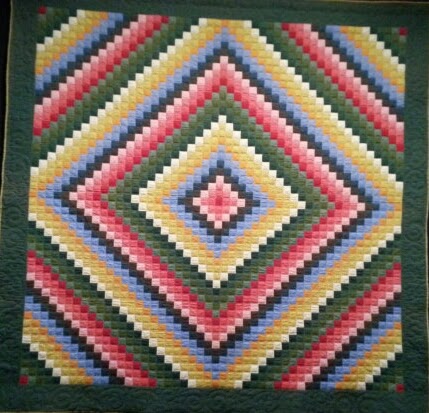
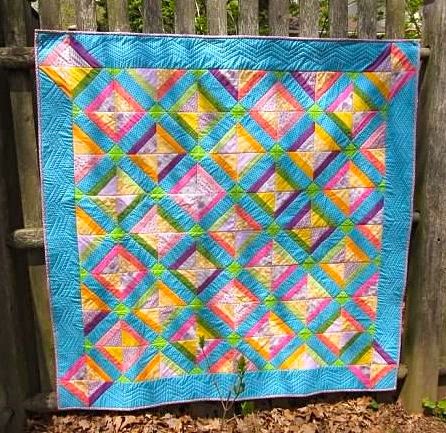
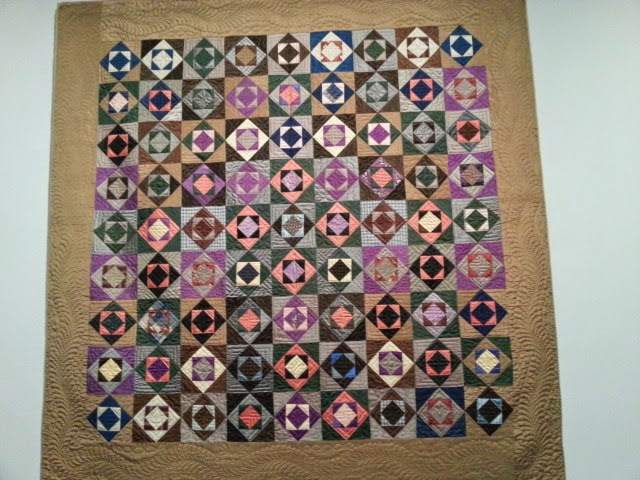
Notice the secondary pattern in this quilt.  It's a Grandmother's garden with hexagons but the small black hexagons outlining large diamonds in the pattern give the quilt the look of baby's block.  Very cool.

Field of Diamonds


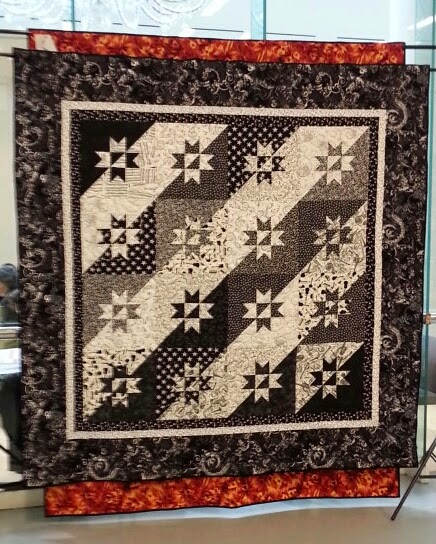
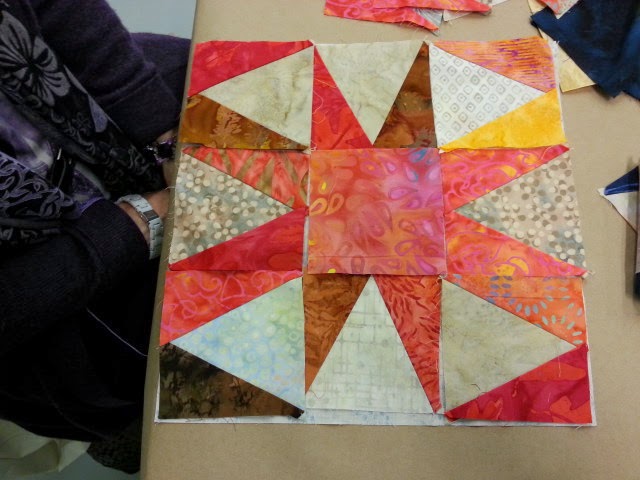
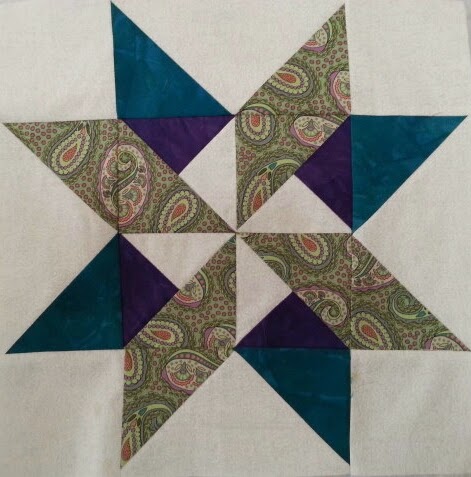
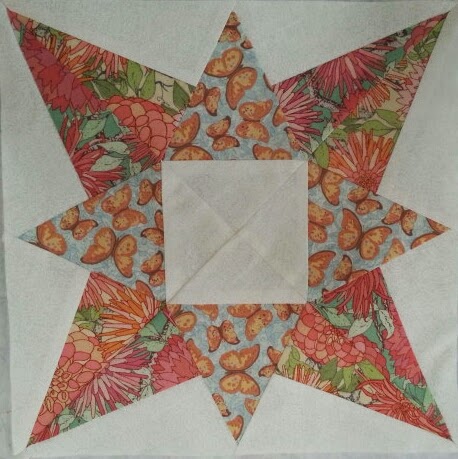
This is a 4 block star variation, made in Pennsylvania between 1880 and 1900.  I especially like the zig-zag border on this quilt.

Four Block Star Variation

The last room in the exhibit was "Singular Visions."  These were quilts which didn't really fit in any of the other categories. 

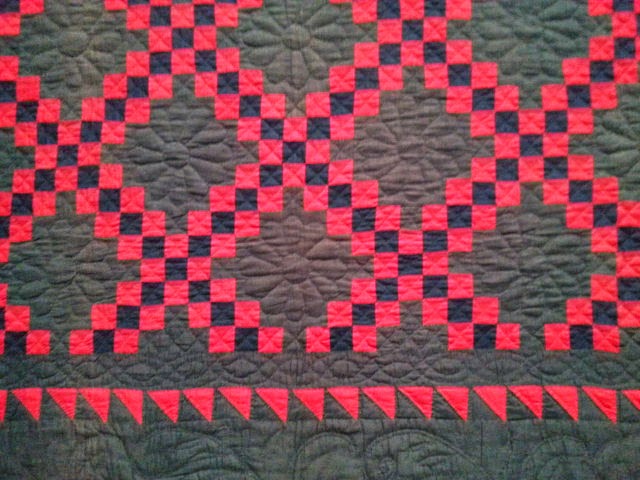
This Seven Sister's quilt is from Pennsylvania in the 1880s.
Seven Sisters


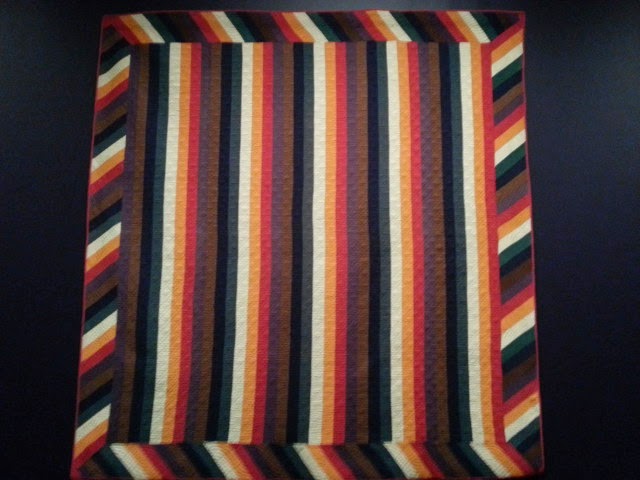
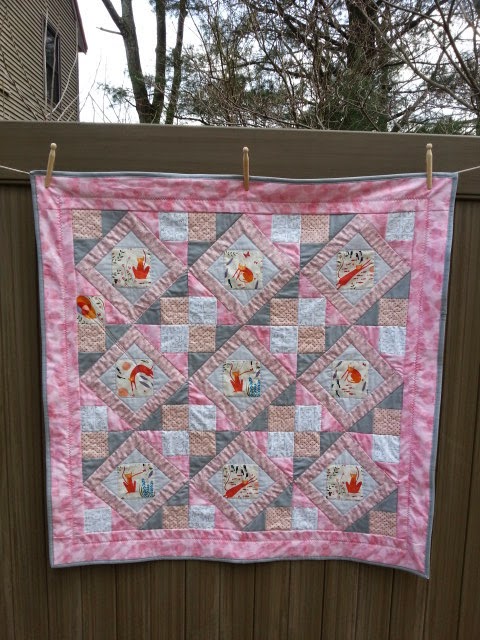
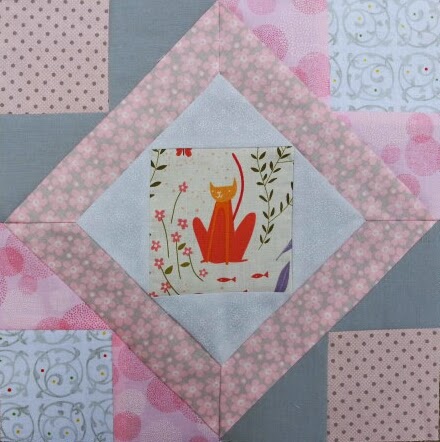
This was a wool tied quilt from Missouri from 1910.  It's delightful.  It is another of my favorites. 

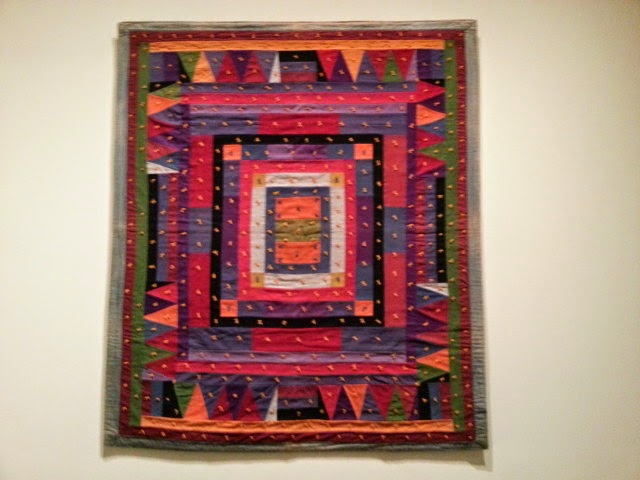
Center Medallion Tied Childs quilt

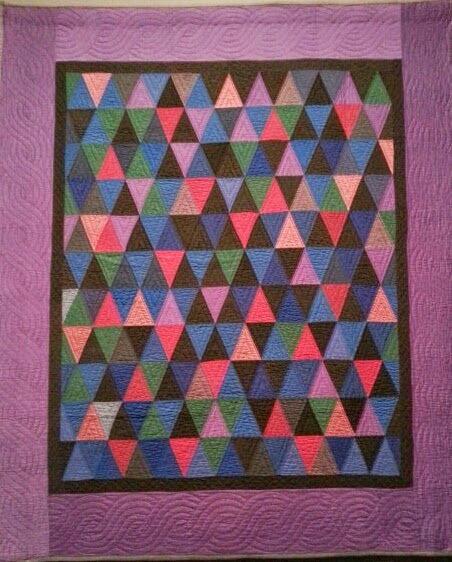
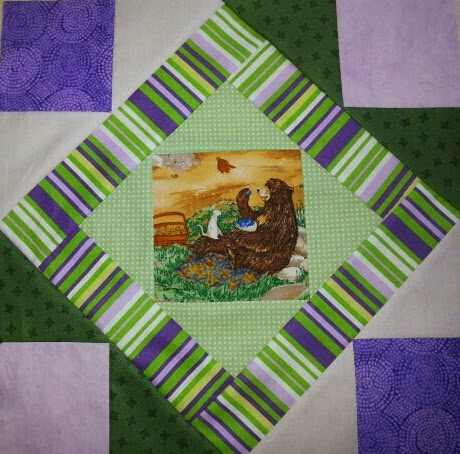
This is Tumbler's Block.  It's quite wonky!  If you didn't know that it was made in Pennsylvania around 1920, you might think this quilt was new.  It looks like one of the current Modern Quilt Movement quilts.
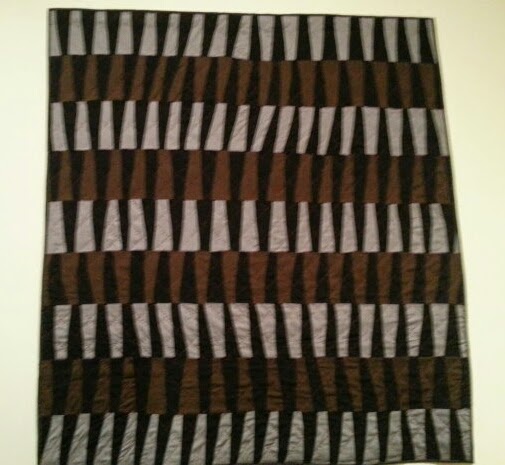
Tumbler's Block

And finally,
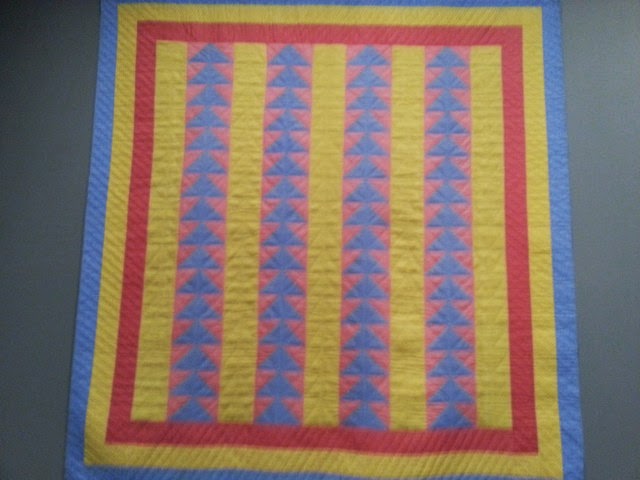
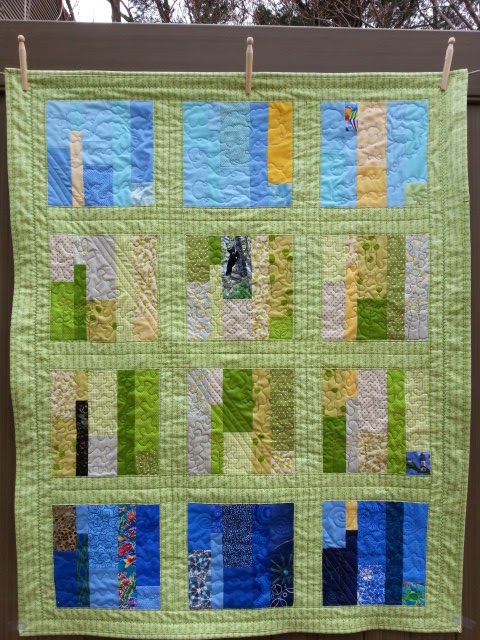
Cross and Losses, made in Maine in the 1900s.  I really like the bold statement made by the simple nine patch blocks alternated with the bar blocks. It's a quilt I didn't really appreciate until I backed up and looked at it from a distance. 
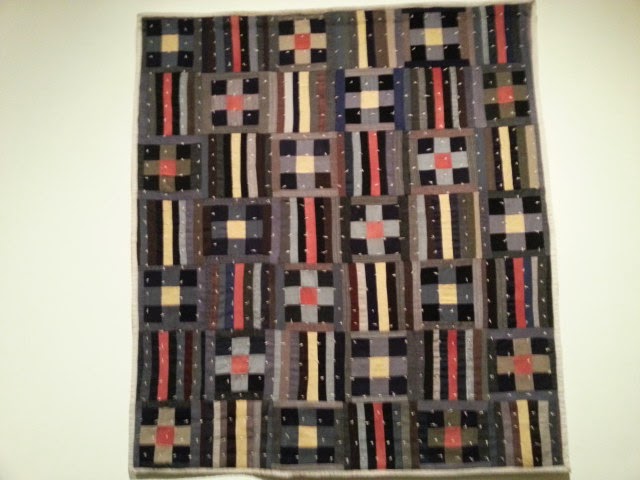
Crosses and Losses


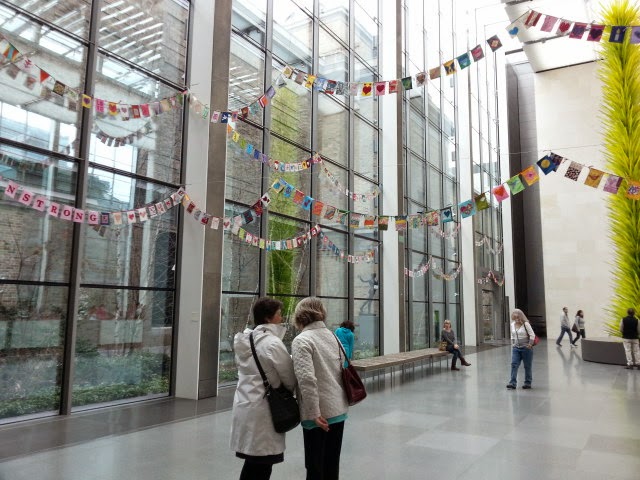
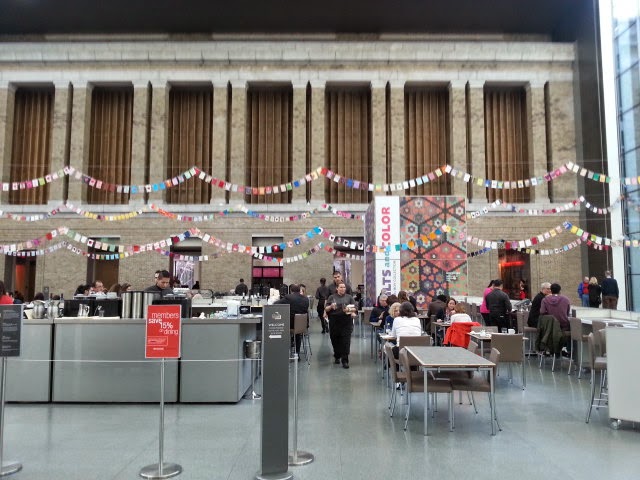
This is a great show.  If you are in the Boston, Massachusetts area any time before July 27, 2014, I highly recommend that you plan to visit the Museum of Fine Arts to see this exhibit.  There are so many more amazing quilts that what I shown in these two posts.  

"Quilts and Color"  is definitely worth the price of admission.   However,  if the cost of museum admission is a hurdle for you,  the MFA is waiving admission fees for a Community Day, Saturday, April 19, 2014 from 10 AM until 4:45 PM.  So you could see the show for free that day. You may also be able to pick up a pass for admission at discounted rate from your local public library.

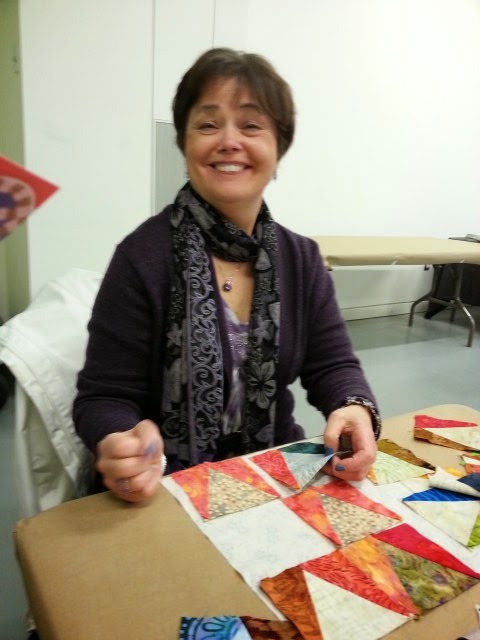
The Artist Demonstration I attended on Sunday is going to be offered again tomorrow, Wednesday April 16th, 2014. 

I hope you get a chance to come to Boston to see all these quilts!


MFA, Boston: Quilts and Color: The Pilgrim/Roy Collection, Part 1

by Judy Tucker


If I had to sum up the new quilt exhibit Quilts and Color at Boston's Museum of Fine Arts in two words I'd say the quilts themselves are fantastic and the colors vibrant.  These two quilt collectors, Gerald Roy and Paul Pilgrim, are both artists.  They definitely have an eye for design and color. There isn't a ho-hum quilt in the collection.

The elevators to the exhibit are are sporting a quilt design

Each room of the exhibit was paired with a painting which helped explain the use of colors and design in the quilts in that room.  There was also a handout with the exhibit which had color wheels that showed how the colors in the quilts related to each other to create various effects.

Here are some of the quilts which I particularly liked.

       This is a Pennsylvania Mennonite quilt made in the 1880s.  It was in the collection of quilts that are in the "Vibration" room.

Ocean Waves


I really like the daisy quilting in this Double Irish Chain, a Mennonite quilt dated 1880-1890.

Double Irish Chain

This was one of the "quietest" quilts in the exhibit.  It was in the "Mixtures" room.

Flying Geese

From the "Harmonies" room.

 An Amish Quilt from the 1930s. I particularly like this quilt.

Thousand Pyramids


In the "Gradations" Room:

This quilt was made in Pennsylvania in the 1880s. The quilt's design is based on the story of Joseph in the Old Testament of the Bible. He was given a coat of many colors by his father which made his brothers very jealous.

Joseph's Coat

This quilt was also made in Pennsylvania in the 1880s.

Sunshine and Shadow


The next room was "Variations."

From Pennsylvania, 1983, this is a log cabin quilt.
Log cabin, Barn Raising Variation
And another Log Cabin quilt from Pennsylvania in the 1870s.

Detail from Log Cabin quilt, Straight Furrow variation

Isn't this amazing?  And these are only a few of the quilts on exhibit.  There are still several more rooms to visit. I'll share some more of my other favorite quilts in my next post.


MFA Boston--Spring into Color: The Artist Demonstration by Anne Gallo and Susan Raban

by Judy Tucker


Four of us went to the Museum of Fine Arts, Boston, today to see the "Quilts and Color: The Pilgrim/Roy Collection" exhibit and the special Artist Demonstration being given just this Sunday.

The "To Boston with Love" flags which were made by quilters from around the world to "honor and support Boston" after the Boston Marathon Bombings 12 months ago, are back on exhibit.  They look great.  With the first anniversary of the bombings coming up in a week,  I'm sure Bostonians still appreciate the support.   I know I do!


The Artist Demonstration given today was on Quilt Making. It was given by Anne Gallo and Susan Raban, 2 women who quilt and teach quilting.  We sat in on a session.  They gave the group a talk about basic quilting.  They had some good show-and-tell to illustrate their talk.

They had brought along 2 quilts and one WIP of the same star pattern but in different color ways.  I was tickled when one of the women said she had put the pieces of a block together and then discovered she had placed them incorrectly according to the pattern she was working from.  When she sat back and looked at this variant block, she saw that her "mistake" made a fabulous block, better than the one she meant to make! That "mistake" created a great quilt!! (See below).  I love quilting and quilters!!

This is the black and white color way of that quilt.  They had one in blues and another in cranberry and tans.


This demonstration also had a great hands-on component. They had set up a table with stacks of batiks cut in squares and pre-sewn triangle patches.  Everyone was invited to sit down and create a block with a pattern of their choice.  There was an example of a star block you could copy hanging on a little design wall but the 2 helpers also encouraged folks do whatever they wanted to with the pieces on the table.

My star block right front

Our friend, Patty, who isn't a quilter, had a great time placing the pieces in different configurations.
There was a glue stick on the table so you could glue the pieces in place on a piece of backing fabric to take them home to sew the block together. Here is Patty working on her block and her finished design.


This was a lot of fun and got us in the mood for viewing the exhibit…
I'll take you on my version of the tour in my next post.


Economy Block Lattice Variation Baby Quilt Completed!

by Judy Tucker


The baby quilt with my Lattice Variation of the Economy Block is done!

The new baby's big sister was visiting me this week.  She chose the layout for the completed blocks, picked the border fabric and the backing.  She also put her stamp of approval on my choice for the binding.

Backing

She picked a quiet light grey and white calico for the backing.  The family has ties to Hawaii so I had thought about using a Hawaiian fabric on the back of the quilt.  The baby's big sister said the Hawaiian fabric was nice but "a bit too much!"   She definitely made a great choice.   A big thanks to K. for all her help!!      

Vetoed!

I asked her to sign the label for the quilt…she really liked that!  It was well deserved--she played a big part in the final design of the quilt.  Here is the label before it was signed:

Two of the individual blocks:

One of the motifs in the fabric is of a cat being carried away by 3 balloons.  When I first put the blocks together, the balloons were in the left upper corner of the block with the cat.  But the physics just didn't work with them there.  The balloon strings would have needed to take a 90 degree turn to connect to the cat.  So I took the balloons out of that block and moved them to the lower left corner of the block above.  Now the cat can float away!


New exhibit, Museum of Fine Arts, Boston

by Judy Tucker


The MFA in Boston opened a new exhibit,  Quilts and Color, yesterday.  I haven't seen it yet but I have heard from a couple friends who have see the exhibit, that it is a great show.

Amy Friend, During Quiet Time.com, put out a post on her blog the other day saying that the MFA is putting together a Facebook album of quilters and their quilts to go along with the show.   I went out with my friends Ginny K. and Janet H. this weekend and we each took a photo to add to the MFA FB  album.

Here's one of my mine.  It's not the picture I submitted to the MFA. I wanted theirs to be different than this one.

They are still accepting photos until April 10th.  Head out and take a picture of you and one or more quilts!  If you click Amy's link above, you will get all the details about submitting the photo.


Can't wait to see your photos on Facebook!
I am also really looking forward to going to see the exhibit at the MFA.

Update on the Charity Quilt for the Somerville Homeless Coalition

by Judy Tucker


Wow!  The PBQ (Proper Bostonian Quilter's) Guild really has come through with the blocks for the Wonky Star Raffle Quilt we are making for the Somerville Homeless Coalition!   Two weeks after we handed out the fabric, guild members turned in 21 completed blocks.  Way to go ladies!!

We had made a few sample blocks so here are all the blocks we have so far!  We just need 4 more and they are already in the works.


We are planning to add a 2.5 inch strip of white fabric around the outer sides of the assembled blocks so they "float."

There will be two outer borders. The first border will be a narrow strip of solid turquoise Kona cotton and next to that a wider border of a crisp looking lattice print fabric with little turquoise accents. The binding will be a deep royal blue binding.


This quilt is really coming along beautifully.  A big thanks to everyone who has been contributed their time and scraps to make a block or two for this project!

Improv Block: Friendly Fox

by Judy Tucker


This is a week of chores and Spring Cleaning, so I haven't had much time for quilting.   But I did take off and hour and a half to try my hand at an improv block, something that I haven't done before.

I had some great fox fabric from Robert Kaufman and then the other day I found some cute chicken fabric from Camelot Cottons. I had a stack of Moda's "boho" 2.5 inch blocks which I added to the mix.


I had the lyrics of Peter, Paul and Mary's song "The Fox" circling in my mind while I was thinking about what to do with these great fabrics.

I've been looking at Yoshiko  Jinzenji's Quilting Line and Color: Techniques and Designs for Abstract Quilts.  It is a really interesting book. The quilts in the book are quite abstract and for the most part, not something I would make.  But I do like the linear pattern of the quilt on the book's cover.   So that was part of the inspiration for this block.


The lyrics of Peter, Paul and Mary's song start "Oh, The fox went out on a chilly night…"
And two lines near the end of the song:   "…they never had such a supper in their life…And the little ones chewed on the bones-o."

I'm afraid I've bowdlerized the song it a bit in my block!  The fox in his vest looks like a friendly sort and the chicks are safe in a hen house!  I doubt there will be any finger lickin' here!


I really like the skinny linear strip just off center in the block with the 2 rectangular elements balancing each other in the corners.  

I made the skinny patterned strip by sewing 4 of the 2.5 inch blocks together. Then I cut that strip of blocks in half vertically. I added another half a block from that fabric line to the end of the adjacent grey strip.  The other 2 small squares came from my stash.

The finished block is about 12.75 inches square.

Not sure what I'm going to do with it.   But I sure had a lot of fun making it!

Economy Block Lattice Variation: On the design wall

by Judy Tucker


Today I got the blocks made for my Lattice Variation of the Economy Block.
It only took me about 4 hours of sewing to assemble the 9 blocks for a baby quilt.

Here are the blocks are on the design wall.


This quilt for a baby girl.  Her big brother and sister are coming for a visit next week.
I'm going to let them decide how to set the blocks and will let them pick the fabrics to use for the border(s).

We have a lot of options!


And look at this great print "Maman" designed by Anne-Marie Bossert for the Petites Filles line by Cloud 9 Fabrics.   I'm going to fussy cut the children leaning over the bassinet for the quilt label.  


Can't wait to see how the finished top comes out!

"I want to learn to quilt someday": Review of a Craftsy course for novice quilters

by Judy Tucker


It was pouring buckets this morning.  I'd donned foul weather gear and taken the dogs out in the rain for their morning walk.  I had a hot cup of coffee, now what to do?

I headed over to Craftsy.com on my computer to see what I could find.   And I found a gem: Piece, Patch, Quilt: Basic Quiltmaking Skills.  This course is taught by Gail Kessler, a quilt shop owner and quilter, and it has 3 hours of video showing all the basic quilting skills you need to make an easy quilt.    And….the course is FREE!

This classes start with picking a pattern.  (The course materials include 3 free patterns. Two of the patterns are for large quilts and one is for a mug rug, about the size of a placemat).  Gail offers insight on how to pick colors, types of fabrics to use and how to best use designs on the fabrics.  She teaches the student how to do rotary cutting and chain piecing.  She goes on with how to assemble the blocks, how to add sashing, borders, bindings and finishes up with making a label.  Everything a novice quilter needs to get going on a first quilt is included the class.  Like all Craftsy classes, you can add notes to yourself  in each video and you can go back as often as needed to review a technique.   In most Craftsy classes, you can ask the instructor a question.  But because this course is free, that option is not available.   Gail does such a great job teaching and demonstrating the quilting process, the typical student should be able to do the lessons without added input.

I watched all 11 lessons today.  I've been quilting for a long time.  My mom had a bachelor's degree in Interior Design so I've been around fabric my entire life.  I thought I knew a lot.  But I learned a number of new things.  Here is a list of some of the great tips I picked up:

1.  Thread is wound by the manufacturer 2 different ways.
        Cross wound tread looks like it has a zig-zag pattern on the spool.  It is supposed to come off the top of the spool so works best if used on the horizontal spool holder on the sewing machine.


        Stacked thread is wound around the spoon in an even circle.  Thread is supposed to come off the spool from the side, to it works best when used on the vertical spool holder on the sewing machine.


2. The colored dots on the selvage of fabrics are called "gams." I think these are so cool.  Each gam indicates a different colored screen needed in the process of printing the fabric's pattern.   Here are the gams for "This and That" by Nancy Halvorson for Benartex LLC.   Gail commented that selvages cut off fabrics used in a quilt could be saved as 'library' for future reference or….used as tomato ties in the garden!  Yikes!   That will cause palpitations in the hearts of lots of folks who use selvages as design elements in their quilts and other sewing projects!
   

3. Pre-washing isn't necessary. Gail recommended that if you wanted to do it, you should just use plain water in the rinse cycle of the washing machine and NOT use any soap.  Put the material in the drier until the fabric is 80% dry, then take it out and iron it.

4.  The walking foot on the sewing machine effectively adds feed dogs on the top surface of what you are sewing.  Along with the feed dogs under the plate on the sewing machine, they work in tandem to help pull the quilt throughout the machine. I love my walking foot.  I use it for quilting and for sewing on bindings.  I knew it makes those projects much easier…I just never knew why!

5.  Sewing machine needles with higher numbers are larger.  HAND sewing needles with higher number are smaller.  Go figure!

6. While threading a needle for hand work,  put the newly cut end of the thread through the needle and pull it all the way out to the end and knot that.  Gail states that the twist on the thread will run through the fabric more easily and you'll get fewer thread tangles!   She also recommends that you not use a tread any longer than the distance from your hand to your elbow. This limits the wear on the thread as it goes through the fabric and the thread should last better and remain stronger over time.

If you want to start quilting, or if you have a friend who wants to learn to quilt, or if you have a rainy Spring day and want to watch some great free videos, head on over to Craftsy and sign up for "Piece, Patch,  Quilt!"  I highly recommend this class!

Vintage Quilt Revival Top is Completed

by Judy Tucker


I finished my Vintage Quilt Revival top today.  The book Vintage Quilt Revival has examples of 3 ways to set the blocks.  I opted for the version with the sashing.   The quilt with the sashing in the book didn't have any borders.  The authors said they felt that was more in keeping with a Modern quilt.  Their quilt with the sashing is on the cover of the book.


Without the borders, the quilt just covered the top of a queen sized bed.  I decided I wanted at least a bit of overhang.  I added 2 extra borders on each side but not at the top or bottom of the quilt.  I think the borders look like a continuation of the sashing, except that the borders don't have the lighter blue blocks at the intersections.

Here is the quilt from the side.  I tried to photograph it outdoors today without success. A weekend rain storm was moving in. Every time I got the quilt set for the picture a gust would catch it.  It was more sail than quilt!  I finally gave up and took it indoors.  Not an ideal location for the photo…but done!


I plan to bind the quilt with the Kona Cadet Blue which is framing the blocks and is the outermost border.  So the binding won't add an extra element to the quilt.

My sewing machine is due for its annual Spring cleaning and tune-up.  I'm going to get that done before I start the quilting on this project.

Castle Walls Block

by Judy Tucker


I was chatting about project ideas with a quilting friend the other day.  She told me that she wants to make a princess quilt but with an interesting twist. It's going to be very cute…but it's her project so I don't want to spill the beans about her idea.

That evening I was looking through the Fat Quarterly book, Shape Workshop for Quilters by Katy Jones, Brioni Greenberg, Tacha Bruecher and John Q. Adams.  With princesses still in my mind, I was very taken by John's block, "Castle Walls."

His block has an open square at the center.   Those open spaces in blocks always call to my imagination.

Now I'm NOT a pink and purple princess person.  In fact, that sort of princess makes me cringe.
I'm more of a 3 siblings (now they don't HAVE to be brothers do they??) set off to find their fortunes type. But I really liked the block.

It was only a short sideways step from Castle to Ivory Tower.  Now that was something I could work with!

The title came first:  "Burning the Midnight Oil in the Ivory Tower."   A scholar, rather than a princess, was going to go in the center of my block…or at least evidence of a scholar!

I started with a bookshelf.
I pulled out a number of strings from my string collection.  They were 3/4 inches to 1.5" wide.
From a 2.5 inch wide piece of Kona cotton "Snow" I cut cream rectangles the width of each of the string strips and sewed them together.


Then I sewed the strips together, staggering the height of the colored portion of the strip to look like books of different heights.


Then I trimmed the "books" to the size needed for the square needed in the center of the quilt block.


I sewed a 1.5 inch brown strip across the bottom of the strip set 3/4 inch from the lower edge of the strips.  Then I flipped the brown fabric down and trimmed it.  That created the book shelf. (See below).

I used 2 different cream colored Kona fabrics for the tower (castle) walls.   The green corners came out of my stash of 2.5 inch squares left over from other projects.  I choose green to make it look like shrubbery around the Ivory Tower!

Then I quilted radiating arcs with yellow thread to indicate the rays from a candle on the scholar's desk which is out of sight below the level of the bookcase.

And I used a boxy quilting pattern to emulate the stone walls of the ivory tower.


Last Sunday at J.P. Knit and Stitch I saw the small Boston Modern Quilt Guild Challenge Quilt wall hanging made by Alice Webb Greer.  She blogs at Alidiza.com.  She is one of the quilters featured in Rachel May's book, Quilting with a Modern Slant.   Alice sewed folded squares into the upper corners under the binding on the back of her wall hanging. A dowel can be tucked under each of the triangles to hang up the piece.  Very clever.  Lots easier and tidier than using a sleeve.

Here are the corners on my wall hanging:


A fun little project.  The Castle Walls Block and not a Pink Princess in sight!

Book Report: Quilts on the Double

by Judy Tucker


I was so happy today when I checked Amazon to see if one of my favorite quilt books is still available…and it is!

Here's my copy--complete with sticky notes from 4 years ago!

Quilts on the Double was written by two Australian quilters, Judy Hooworth and Margaret Rolfe.
This is a book of easy strip pieced designs but there are 2 amazing things about this book:

1. With careful cutting and the addition of a bit of extra fabric you can get three quilts from one set of strips!
2.  There are 50 different ways to construct the blocks, all of which are illustrated the the book!

The patterns are divided in to Tops, Tails and Sides.
Here are the first 2 quilts I made using the book.  (I didn't use the Sides for a third quilt).


Tops Quilt

Tail's Quilt
Clearly, these weren't quilts with Modern aesthetics!

Here is a Tails Quilt that I made from a different strip set.  Quite a bit brighter!


I did make a set of pinwheels from the Sides from this set of strips but I don't have photos of them or the Tops quilt from these fabrics.

I have been thinking at lot recently about going back to use this book again, this time to make several Modern quilts with solid fabrics (and maybe some Modern prints).

Fabric requirements:
    6 coordinating Fat Quarters
    6 contrasting Fat Quarters
    2 yards of an accent fabric that compliments both sets of Fat Quarters

I don't have a lot of solids in my stash anymore so I set off on an Internet search to see what I could find.  Because these fabrics will make 3 quilts, I needed to find solid colors that I really like.

I looked at the stack of Kona Sunrise FQs.  I do like them but I already have that collection in 2 sets of charm squares so it didn't make much sense to repeat that.

Then I found the set of "Summer Basics" in Moda Bella Solids from the Etsy Fabricshoppe.  There are only 8 FQ in this collection.  But I really like the 4 warms and 4 cool colors in this collection and I think I have some fabrics in my stash to add 2 more warm FQs and 2 more cool FQs.   I might have an accent fabric but will have to wait for the fabric to arrive before I can decide that.

I'm excited to use Quilts on the Double but from a Modern perspective.   I think it will be a great Spring/Summer project!  I can't wait for my fabric to arrive so I can get started!


It takes a Village: Why it's good to have a friend look at (and test) your new design

by Judy Tucker


It's great to have quilting friends.  They often look at a quilting project from a totally different perspective which can be really interesting…and sometimes, very helpful.

I took my Economy Block Lattice Variation cat block to our Proper Bostonian Quilter's Saturday Day Camp this weekend and showed it to the folks who there sewing that day.  Everyone really liked the block and my choice of fabrics.  

Here is is again:


My friend, Kace, picked up my block and looked at it closely.  "You used foundation piecing to make this block?" she asked.  "If I had designed this block…."

Her comments were ….Brilliant!  I had "EQ 7 brain".  If I had created the design on the computer, it had to be good.  Right?   Maybe not so much!!  The computer designed block is beautiful and its symmetry is lovely.  But it is hard to sew those "Y" seams making the mitered corners on the strips framing the center block using the foundation piecing.  I hadn't even thought to look at the block to see if there were a better way to make it.

Kace suggested 2 alternative ways to construct the block without using foundation piecing.
1.  Cut the framing strips straight without mitering the corners.
2.  Cut the framing strips longer, and create a miter without the Y seam, the way you would make a mitered border on a quilt.
Kace is going make a test block to see how it works to miter the framing strips without the Y seam.

I went home and made a maquette (a sample) of the block using the straight strips.  It was much easier and faster to construct the block this way. And the block is much sturdier.  In my foundation pieced block, the inner corners of the mitered strips are weak spots.


I really like the symmetry of the mitered framing strips.  But I am using this block to make a baby quilt which going to get a lot of wear and tear.  So for a baby quilt, I think the best way to construct the block is to use the straight cut pieces to make the frame.  I think it will hold up better over time and it won't change the over-all look of design in the finished quilt.

So thank you Kace for seeing my design from not one, but two, different perspectives!
This project is going to be much better baby quilt thanks to your input!

I'll post the pattern(s) when I finish the quilt and have all the details.


Low Volume Green and Blue Strip Baby Quilt Completed (with pattern)

by Judy Tucker


The Low Volume Green and Blue Strip Baby Quilt is done!   I did the quilting this morning and put on the binding this afternoon. 

I had so much fun with the quilting.  There are clouds and a couple birds in the sky blocks.  I put in a bee hive just out of reach of the bear in the top center forest block.  There are lots of flowers in the forest blocks too.  And somehow Jack in the Bean Stalk's vine got in one strip too!

My waves have gotten a lot better since the last time I did them in my {Big} City Girl quilt.  I marked the quilt with chalk before I put the layers together but the chalk and mostly rubbed off by the time I got to quilting the ocean blocks.   

So I stopped and put 2 pieces of felt together and practiced the quilting waves.  That was very helpful. Because I was working with piece of felt that was about 8 inches by 12 inches I was able to turn it around to determine which direction was best for quilting the waves.  I found that if I turned the the quilt sideways and stitched the pattern moving with the curl of the waves coming towards myself (the waves turned 90 degrees from the way they would be viewed on the quilt) I had both good control of the quilting and a great view of what I was sewing.  


I put in a small school of fish one one of the ocean blocks.  And there is a sea snail in another block.

Running diagonally from the upper left to the lower right is are beams of sunlight stitched in light yellow thread.

And on the back:
The Hawaiian fabric, as requested!


With the Mom's request for foliage, waves and ocean colors, Hawaiian fabric, no juvenile prints and a "calm" pattern, this baby quilt was quite a design challenge.  It was a lot of fun to make…and to quilt!

PDF Low Volume Green and Blue Baby Quilt Pattern

Low Volume Green and Blue Strip Pieced Baby Quilt Pattern

by Judy Tucker


        Low Volume Green and Blue Strip Pieced Baby Quilt
                                      (Sky, Forest and Ocean)
                                               38 x 48.5 inches


This would be a good quilt to use up bits and pieces in your stash.  Or you could start with fat quarters if you prefer. 

I used lighter blues in my sky and darker blues in my ocean. I added some yellow strips and some fussy cut strips with forest animals and ocean creatures. If you are using fat quarters, choose 7 medium blue fabrics which could be sky or ocean, 2 lighter blue fabrics to add to the sky and 2 darker blues to add to the ocean.


PDF of Low Volume Green and Blue Pieced Baby Quilt Pattern

Fabric Requirements:

Blues:  9 (11 if you are using added colors for sky and ocean) pieces of blue      fabric 11.5 inches wide x 10 inches high
Greens:  9 pieces of green fabric 11.5 inches wide x 10 inches high
     (You will end up with enough strips for 3 extra blue and 3 extra green blocks).

Scraps:  Strips of yellow fabric or fussy cut strips to substitute for some of the pieces in the blocks if you wish to do that.

For the sashing and binding:  1.5 yards green fabric.  (2 yards if you have vertical pattern and don’t want to piece the long stashing strips).
Backing: 1.5 yards
Binding:  cut 5 strips WOF to the width you prefer for your bindings.  (2.25 inches is a good width if you aren’t sure).

Cutting Instructions:

Label 9 small sandwich bags letters A through I.  One for each strip you will be cutting. 
You will need 2 sets of bags: one for blues and one for green fabric strips.

Stack 3-4 pieces of your 11.5 x10 inch fabrics.  Cut as shown on following 2 pages.

Cut 9 sashing strips 9.5 inches x 3 inches.

You will also need
  Two strips of sashing 3 inches wide for 2 middle vertical rows of sashing
  Two strips of sashing 3.5 inches wide for the right and left side of the quilt
Two 3 inch strips of sashing for the top and bottom of the quilt.
I recommend that you cut these after you have assembled the 3 vertical rows of blocks.

Construction:
Assemble your blocks on a design wall.  You should have a different fabric for each piece in a block.

Sew your blocks together per the diagram on the next page.  The block should be 9.5 inches square and will finish at 9 inches square.

Attach a piece of 9.5 x 3 inch sashing to bottom edge of your sky blocks and forest blocks. 
Sew the blocks together in vertical rows: Sky, forest, forest, ocean.  You will then have 3 vertical sets of blocks, each containing 4 blocks.

Measure each of the long strips of blocks. 
Now cut your 2 outer and 2 middle sashing strips to measure your quilt.

Attach the 2 middle strips of sashing, then the 2 later strips.

Finally measure the width of your quilt at its center.  Cut the top and bottom sashing strips to that width.
Attach to the quilt body.


Finishing:

Quilt and bind as desired.


Economy Block Lattice Variation for a Baby Quilt: Designing the Block and Quilt

by Judy Tucker


I have another baby quilt to make!  (Are we in the midst of a baby boom?)  This quilt is for a baby girl. I showed Mom the stash of baby friendly fabrics I had and she thought one with cats on it was cute. But she is planning on decorating the nursery in light pink and grey. The cat fabric she liked is oranges, brown and soft greens.  I didn't think I could translate this fabric into a pink and grey baby quilt.


Here is the group of fabrics I showed her. 
They were fabrics I had in my stash that coordinated well together.

But I also had a yard of Andover Fabrics "Cat Dream" from Lizzie House's "Catnip" line.  While the colors in this fabric are mainly melon to orange, the little flowers in the design are a soft pink.  With some fussy cutting, I thought I could make this cat fabric work for my project.


I sat down with EQ 7 this morning to design a block for this baby quilt.  I wanted to use the Economy Block (square in a square) in this quilt but I needed to add several fabrics to the block to push this fabric toward the pinks and greys. That meant the block needed to be fairly large. Here is my block design:


 The block is 12.5 inches and will finish at 12 inches square.  It is a foundation pattern.

Here is a mock up of the whole quilt using this block.  The finished quilt will be 42 x 42 inches.
I like the zig-zag like pattern created by dark grey and the dark pink.  I might add some rick-rack somewhere on the the borders to echo that pattern.


My next task was to test the block to see how it worked. To date, all of the quilts I have designed and posted on my blog have been Easy/Beginner level blocks.  This one is an Complex/Advanced level block.  The paper piecing is straight forward.  But then the center Economy block is inset with mitered corners.  It takes some partial seams to get the block constructed but it can be done!

Here is my first block.  


Just 8 more to go!

I will post the pattern after I finish the quilt when I have all the details and can give some you some tips on the block construction.  I can't wait to see how it looks when I have more blocks. 


Vintage Quilt Revival Blocks completed!

by Judy Tucker


Here it is, the very last of the paper shredding for my Vintage Quilt Revival sampler quilt!  I finished the last block today.


I put together 4 blocks this week, so I am a week ahead of the Flickr Group, Vintage Quilt Revival Block Along schedule.

Here are the blocks I just finished:

Classic Star and Pinwheel Block

Classic Mosaic Block

Classic Exploding Star Block
(Don't you just love that name.  But it makes me
wonder if there is a Black Hole around here somewhere)!

Classic Geometric Star Block
And here are all the blocks laid out:


The book, Vintage Quilt Revival: 22 Modern Designs from Classic Blocks,  (see sidebar right), shows the blocks in 3 possible setting.  One is similar to the layout here.  This only makes a lap sized quilt.  With each block taking me 2+ hours to make, I want it to be a more substantial quilt.  And it think the details of each block are better appreciated when they aren't right next to each other.  

Setting the blocks on point is beautiful. However,  my background white came from my stash and I don't have enough to make the setting blocks, nor do I want a quilt with a lot of white.  Too many 4 footed friends in this house to do that!!

The last suggestion is to put sashing between the blocks.  I searched through my stash this morning but it doesn't look like I have anything that will do.  But I did find some lovely fabric for the backing, so it was a well spend morning!


Setting of the blocks to follow at a later date -- when I know what I want to do!

Constructing the Low Volume Green and Blue Strip Baby Quilt: Part 2

by Judy Tucker


In between doing training with my dogs I did get in some good sewing time this weekend.

The baby quilt top I am working on is done and ready to be quilted.  I'm really pleased with it so far.
I used the sashing to add an element of order to the blocks.  The mother of the baby asked for a "quiet" quilt and I think the sashing helps calm down the strip pieced blocks.  It also makes it look like you are looking at the world through a latticed window.

I'm really looking forward to quilting it.  I am going to do free motion quilting on my domestic sewing machine and plan to add more sky and ocean elements with the quilting.

Blocks on the design wall, ready for sewing.

Blocks coming together

Completed quilt top

Constructing the Low Volume Green and Blue Strip Baby Quilt: Part 1

by Judy Tucker


Today I got the strips for the baby quilt all cut.  I decided to stack the greens (3-4 at a time) to cut them.  That gave me enough strips for 3 extra blocks.  I thought it made more sense to save the time rather than cutting all the strips individually.  I'll find a use for the extra blocks.

I did cut the strips for the sky and ocean individually.

I had time to sew the 3 sky and 3 ocean blocks.  I really like them.  There are repeating blues in the sky.  I didn't have enough pale blues to make them all different.


I also sorted the low volume green strips into blocks.  I used 9 green fabrics, the number of strips in each block, so there are no repeats in any given block.  I put them up on the design wall so I see them all and check for duplicates.


I also put the pieces with animals and objects in their places in the blocks.
I think I'll be able to get the quilt top finished up in the next couple days.
Once the strips are cut, it goes together quickly.


Designing a Low Volume Green and Blue Strip Baby Quilt

by Judy Tucker


I've been asked to make a baby quilt that doesn't use juvenile fabrics.  The new mom requested
a quilt that is green and royal blue with a few yellow accents.  She also asked for foliage, waves, and Hawaiian fabric! And she wants the quilt to be "quiet." Whew!  That's a challenge.

For the past couple years I have been thinking about Elizabeth Hartman's quilt "Batch of Brownies" in her book, The Practical Guide to Patchwork.  It's a "stack, cut and shuffle" strip quilt with rectangular blocks. What fascinates me about this quilt is the deer peeking out of some of the squares in the quilt's  green blocks.  I'm interested in all sorts of "I Spy" quilts and her quilt has an I Spy element.  Children really enjoy looking for hidden things in pictures (and quilts).  The quilt I am making isn't going to be a typical baby quilt but I am planning to hide a few animals and other things in blocks.

Learning to use Electric Quilt 7 to design original blocks and quilts is on my To-Do list for this year.  So today I sat down and watched EQ's helpful video about using Patch Draw to design blocks. Then I got to work.  I had to refer to the Help files for several topics but for the first time, I managed to design a block and quilt completely on the computer without resorting to pencil and paper!

Here is the pattern I created.  I had sky, forest and ocean in mind when I designed it. The bright or dark color patches in the blocks are markers for the things I want to hide in the quilt.  The yellow sunlight in the sky filters through the forest and sparkles on the surf in the ocean.


The colors from the EQ file shown here are much more vivid than the fabrics I have picked for the quilt.  But it does give a idea about how the completed quilt will look like.  I am using a soft green foliage fabric for the sashing to quiet the activity in the blocks.

Sky Fabrics

Forest Fabrics--the green on the right will be the sashing

Ocean Fabrics
Hawaiian Fabric for the Backing

I can't wait start sewing the blocks and to see how this quilt comes together.  I'll keep you posted on my progress!