Search
  • Information
    • About
    • Contact
    • Privacy Policy
  • Blog
  • Subscribe
  • Tutorials
    • Tutorials
    • Doll Clothes: Photos and some Patterns
  • Suggested Reading
  • Quilts: My Original Designs
  • Gallery: Color Studies
  • Gallery: Quilts I've Made
  • Doll Making Blog Posts
  • Recent blog posts
  • Quilts Based on The Improv Handbook for Modern Quilters
Close
Menu
Search
Close
  • Information
    • About
    • Contact
    • Privacy Policy
  • Blog
  • Subscribe
  • Tutorials
    • Tutorials
    • Doll Clothes: Photos and some Patterns
  • Suggested Reading
  • Quilts: My Original Designs
  • Gallery: Color Studies
  • Gallery: Quilts I've Made
  • Doll Making Blog Posts
  • Recent blog posts
  • Quilts Based on The Improv Handbook for Modern Quilters
Menu

Sleeping Dog Quilts

SLEEPING DOG QUILTS

January 14, 2021

Knitting a "Look Out! Winter Hat"

by Judy Tucker


“Look Out! Winter Hat” designed  by Roberta Rich

“Look Out! Winter Hat” designed by Roberta Rich

“Look Out! Winter Hat” designed  by Roberta Rich

“Look Out! Winter Hat” designed by Roberta Rich

Every once in a while you have a moment of pure serendipity. A few weeks ago I decided I wanted a new winter hat. I dug around in my small yarn stash and found I had a full skein of worsted weight wool yarn. Then I went to see which size needles I had that matched in a circular 16 inch and straight needles. I found a set of US size 7. (Though later I found a set of US 6 needles too).

Then I went to Ravelry.com to see if I could find a pattern I liked using US size 7 needles and worsted weight yarn.

After a bit of perusing, I came upon this “Look Out! Winter Hat” designed by Roberta Rich, from just this past year 2020. I liked that it covers the ears—the ear sections actually curve around and hug your ears! And I loved her introduction that states this hat is great for “kids on the playground to adults who wear hardhats”! This hat is awesome!

The hat’s border is knit a flat piece first and then you pick up stitches to knit the crown. The crown can be worked in the round or flat and sewn together at the end. So it’s a really versatile pattern.

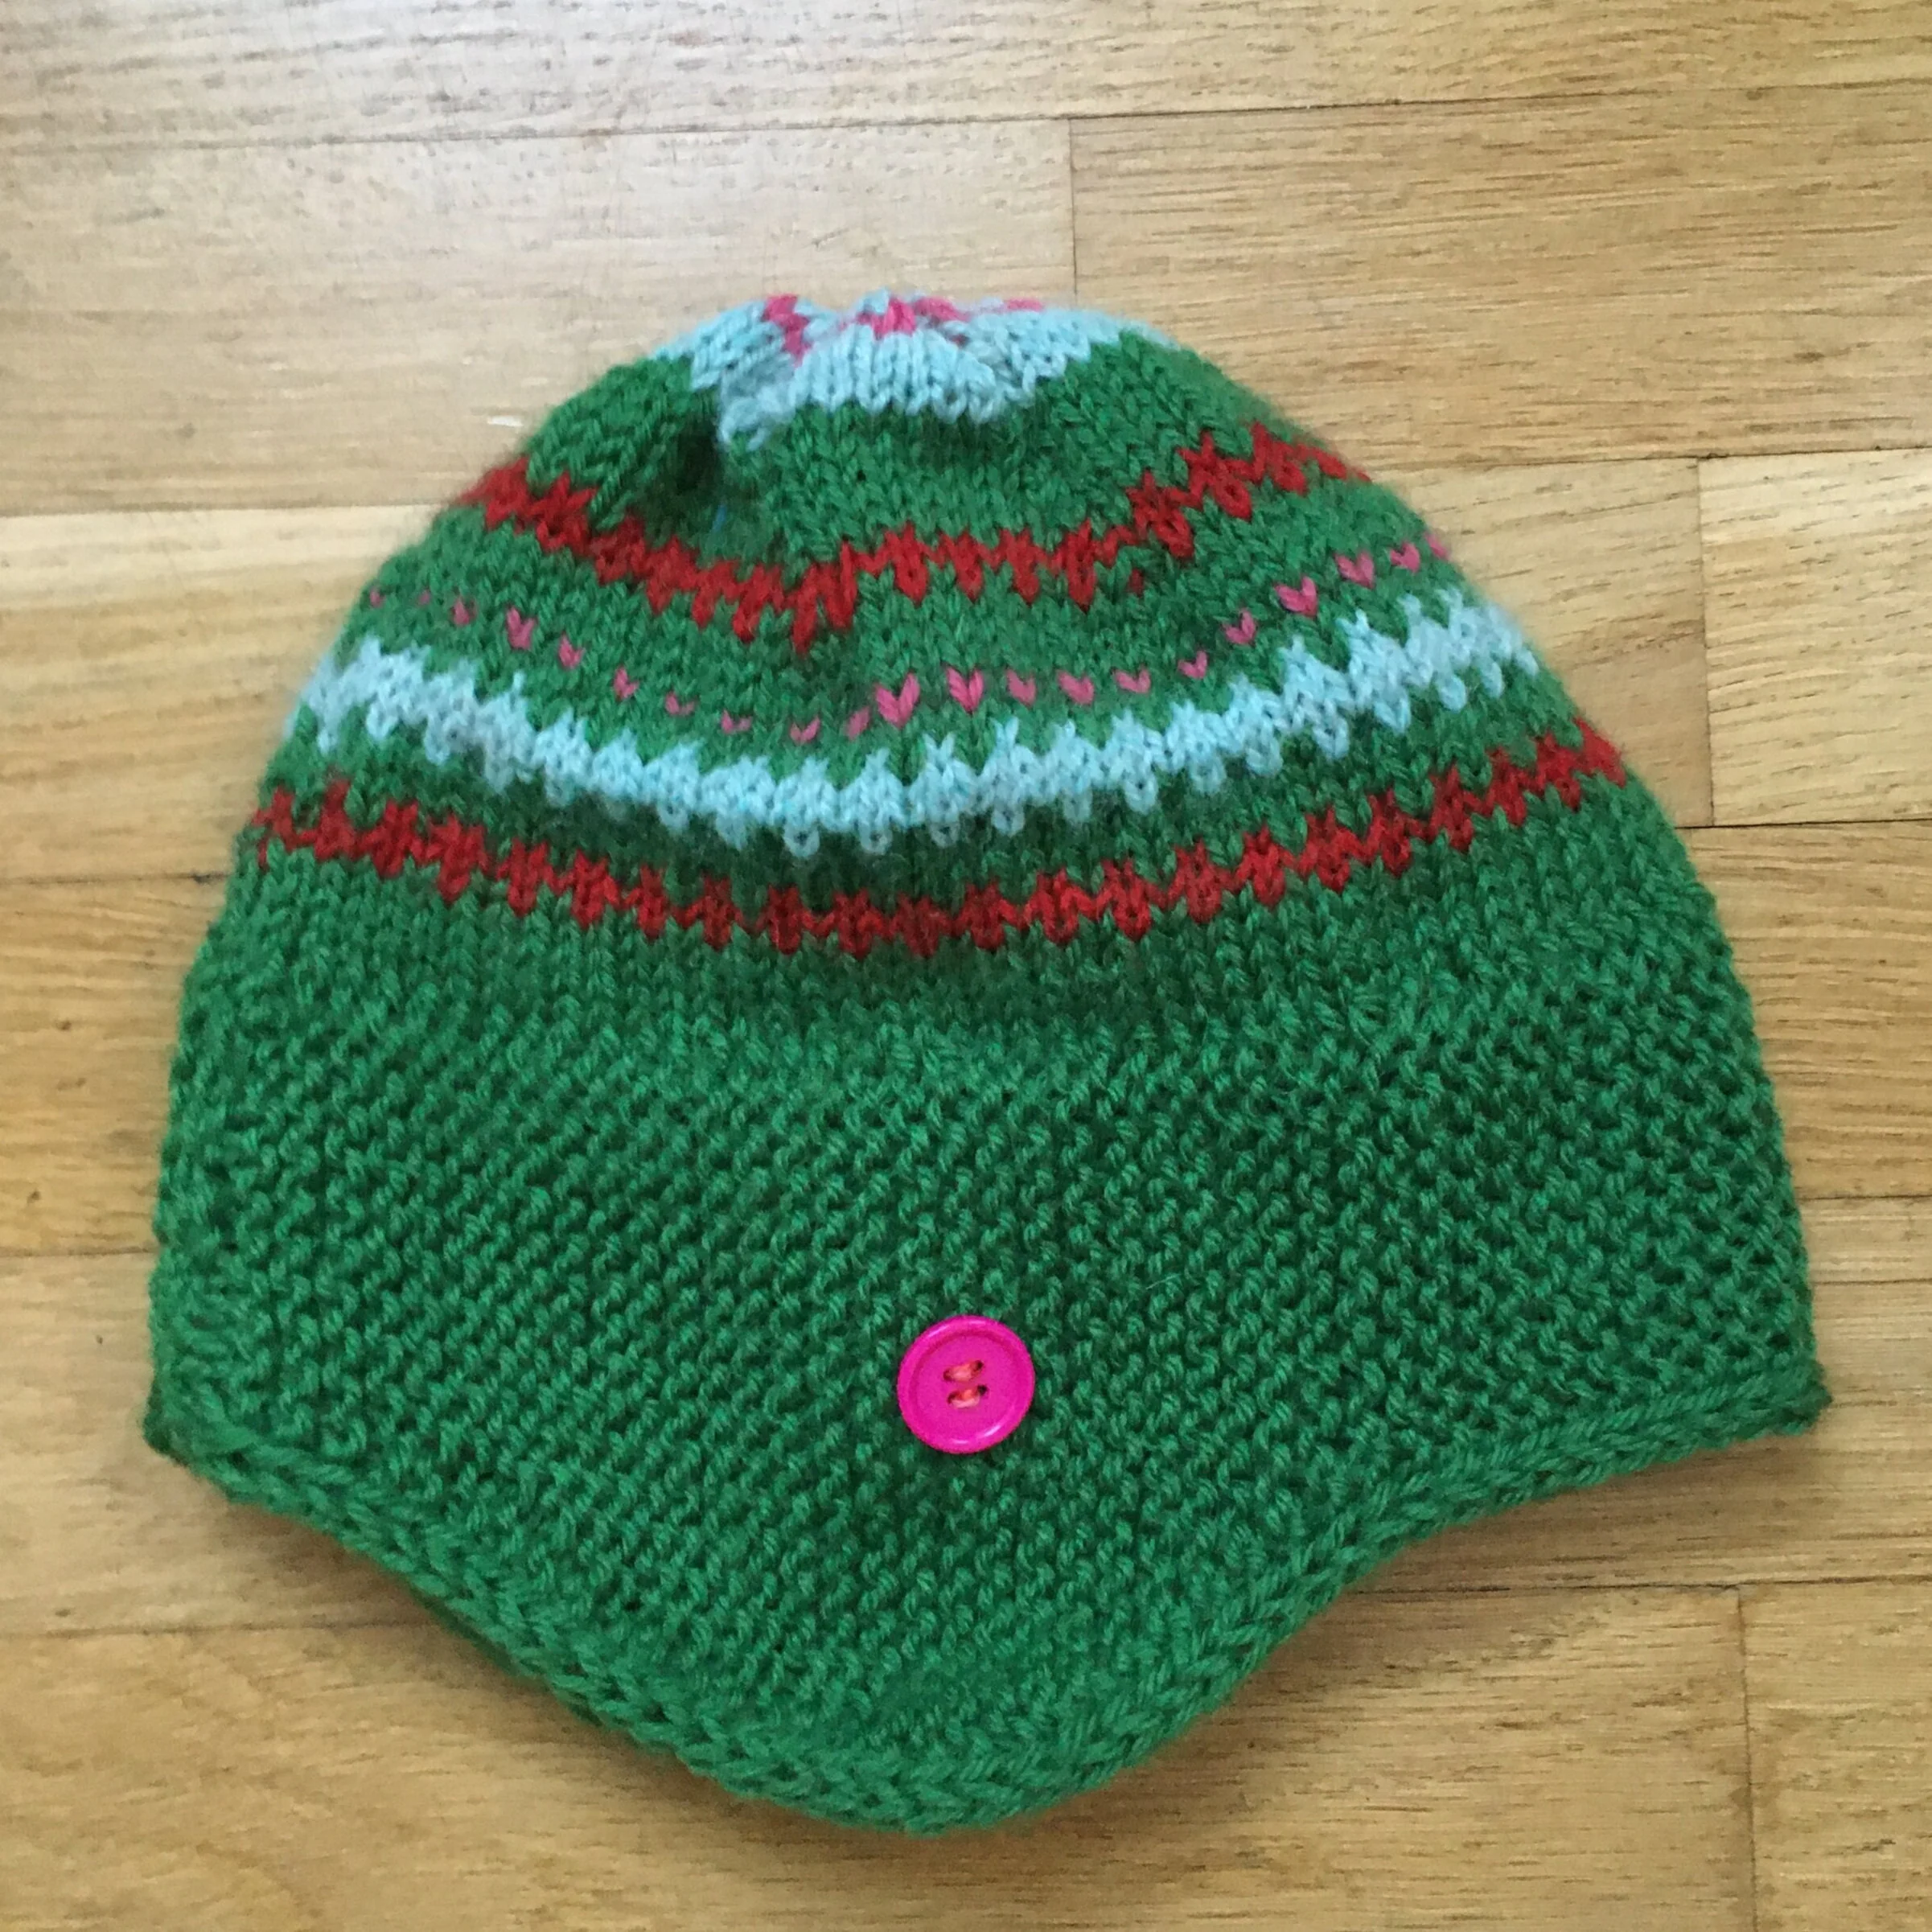
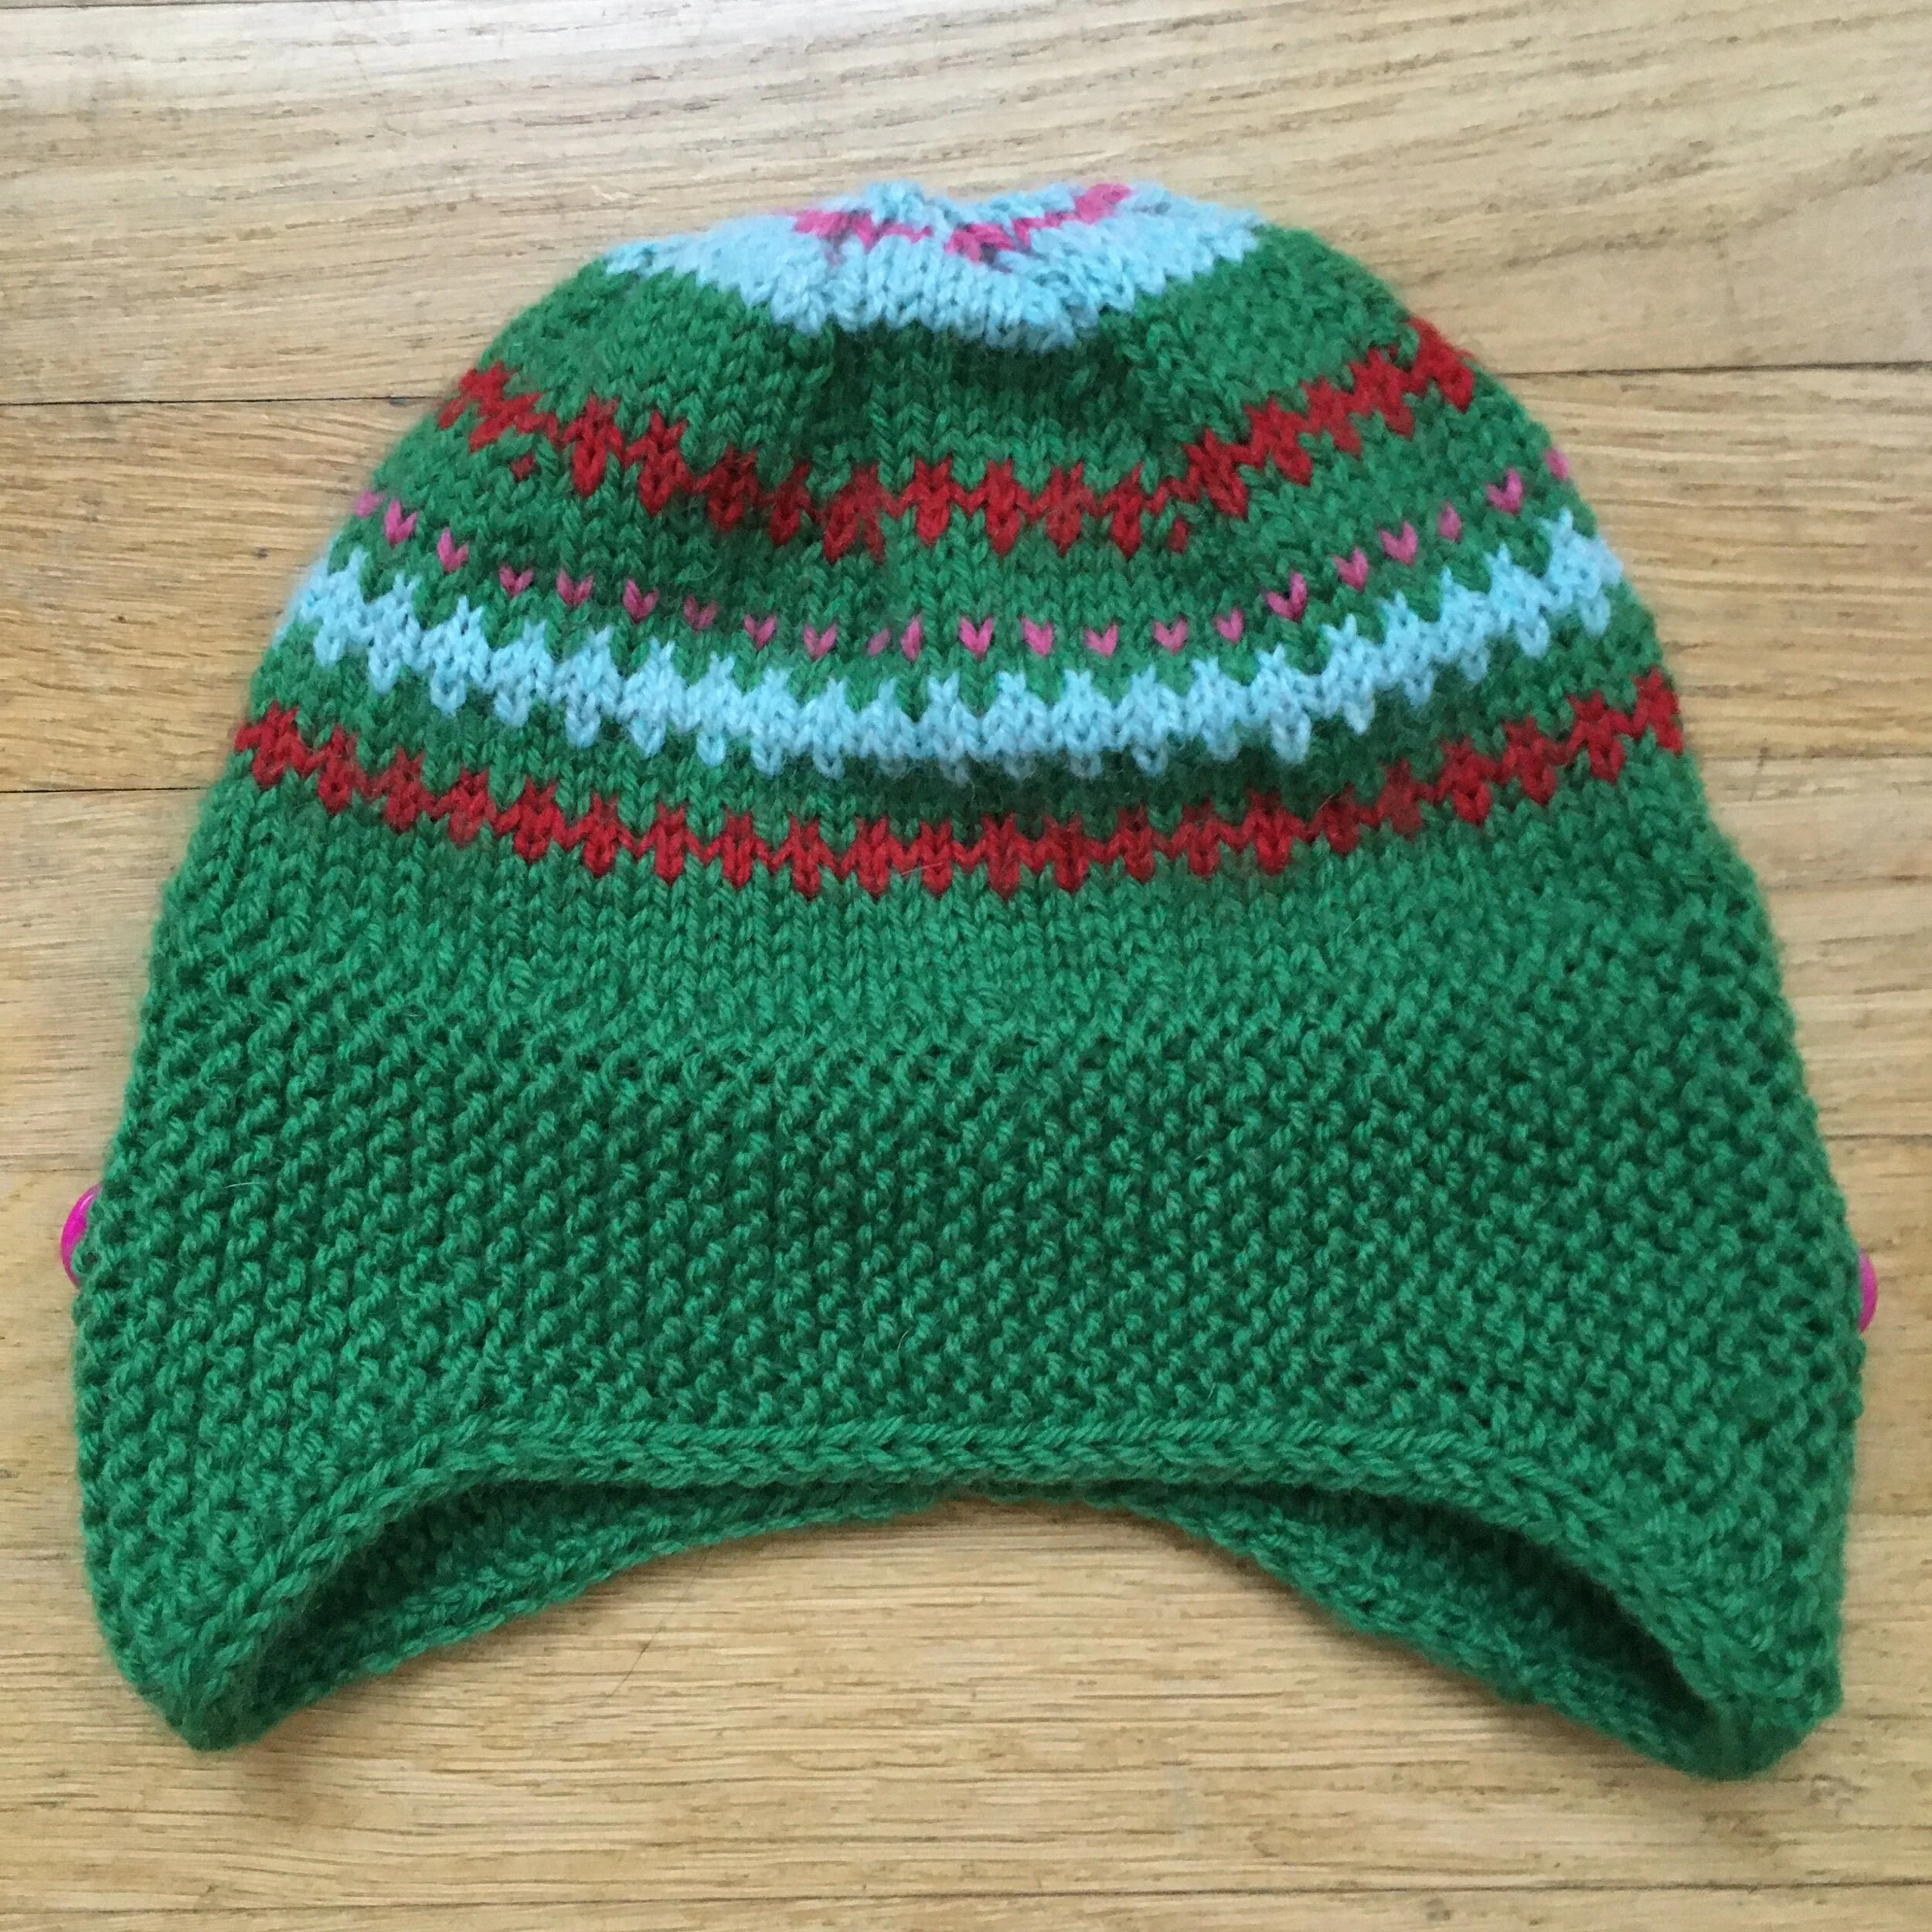
The hats pictured on the pattern were either striped or a solid color. I had some yarn odds and ends so just did an improvisation design on the crown, without making myself a stitch pattern.

The pattern itself is great. I was initially baffled by the wrong side row instructions which tell you to slip the last 3 stitches in the row. I did that and found I had a loose chain forming. I knew that couldn’t be right. So I tried again and discovered the it works perfectly if you slip two stitches as if to purl and actually purl the the last stitch. It’s those slipped stitches which create the beautiful edging on the hat.

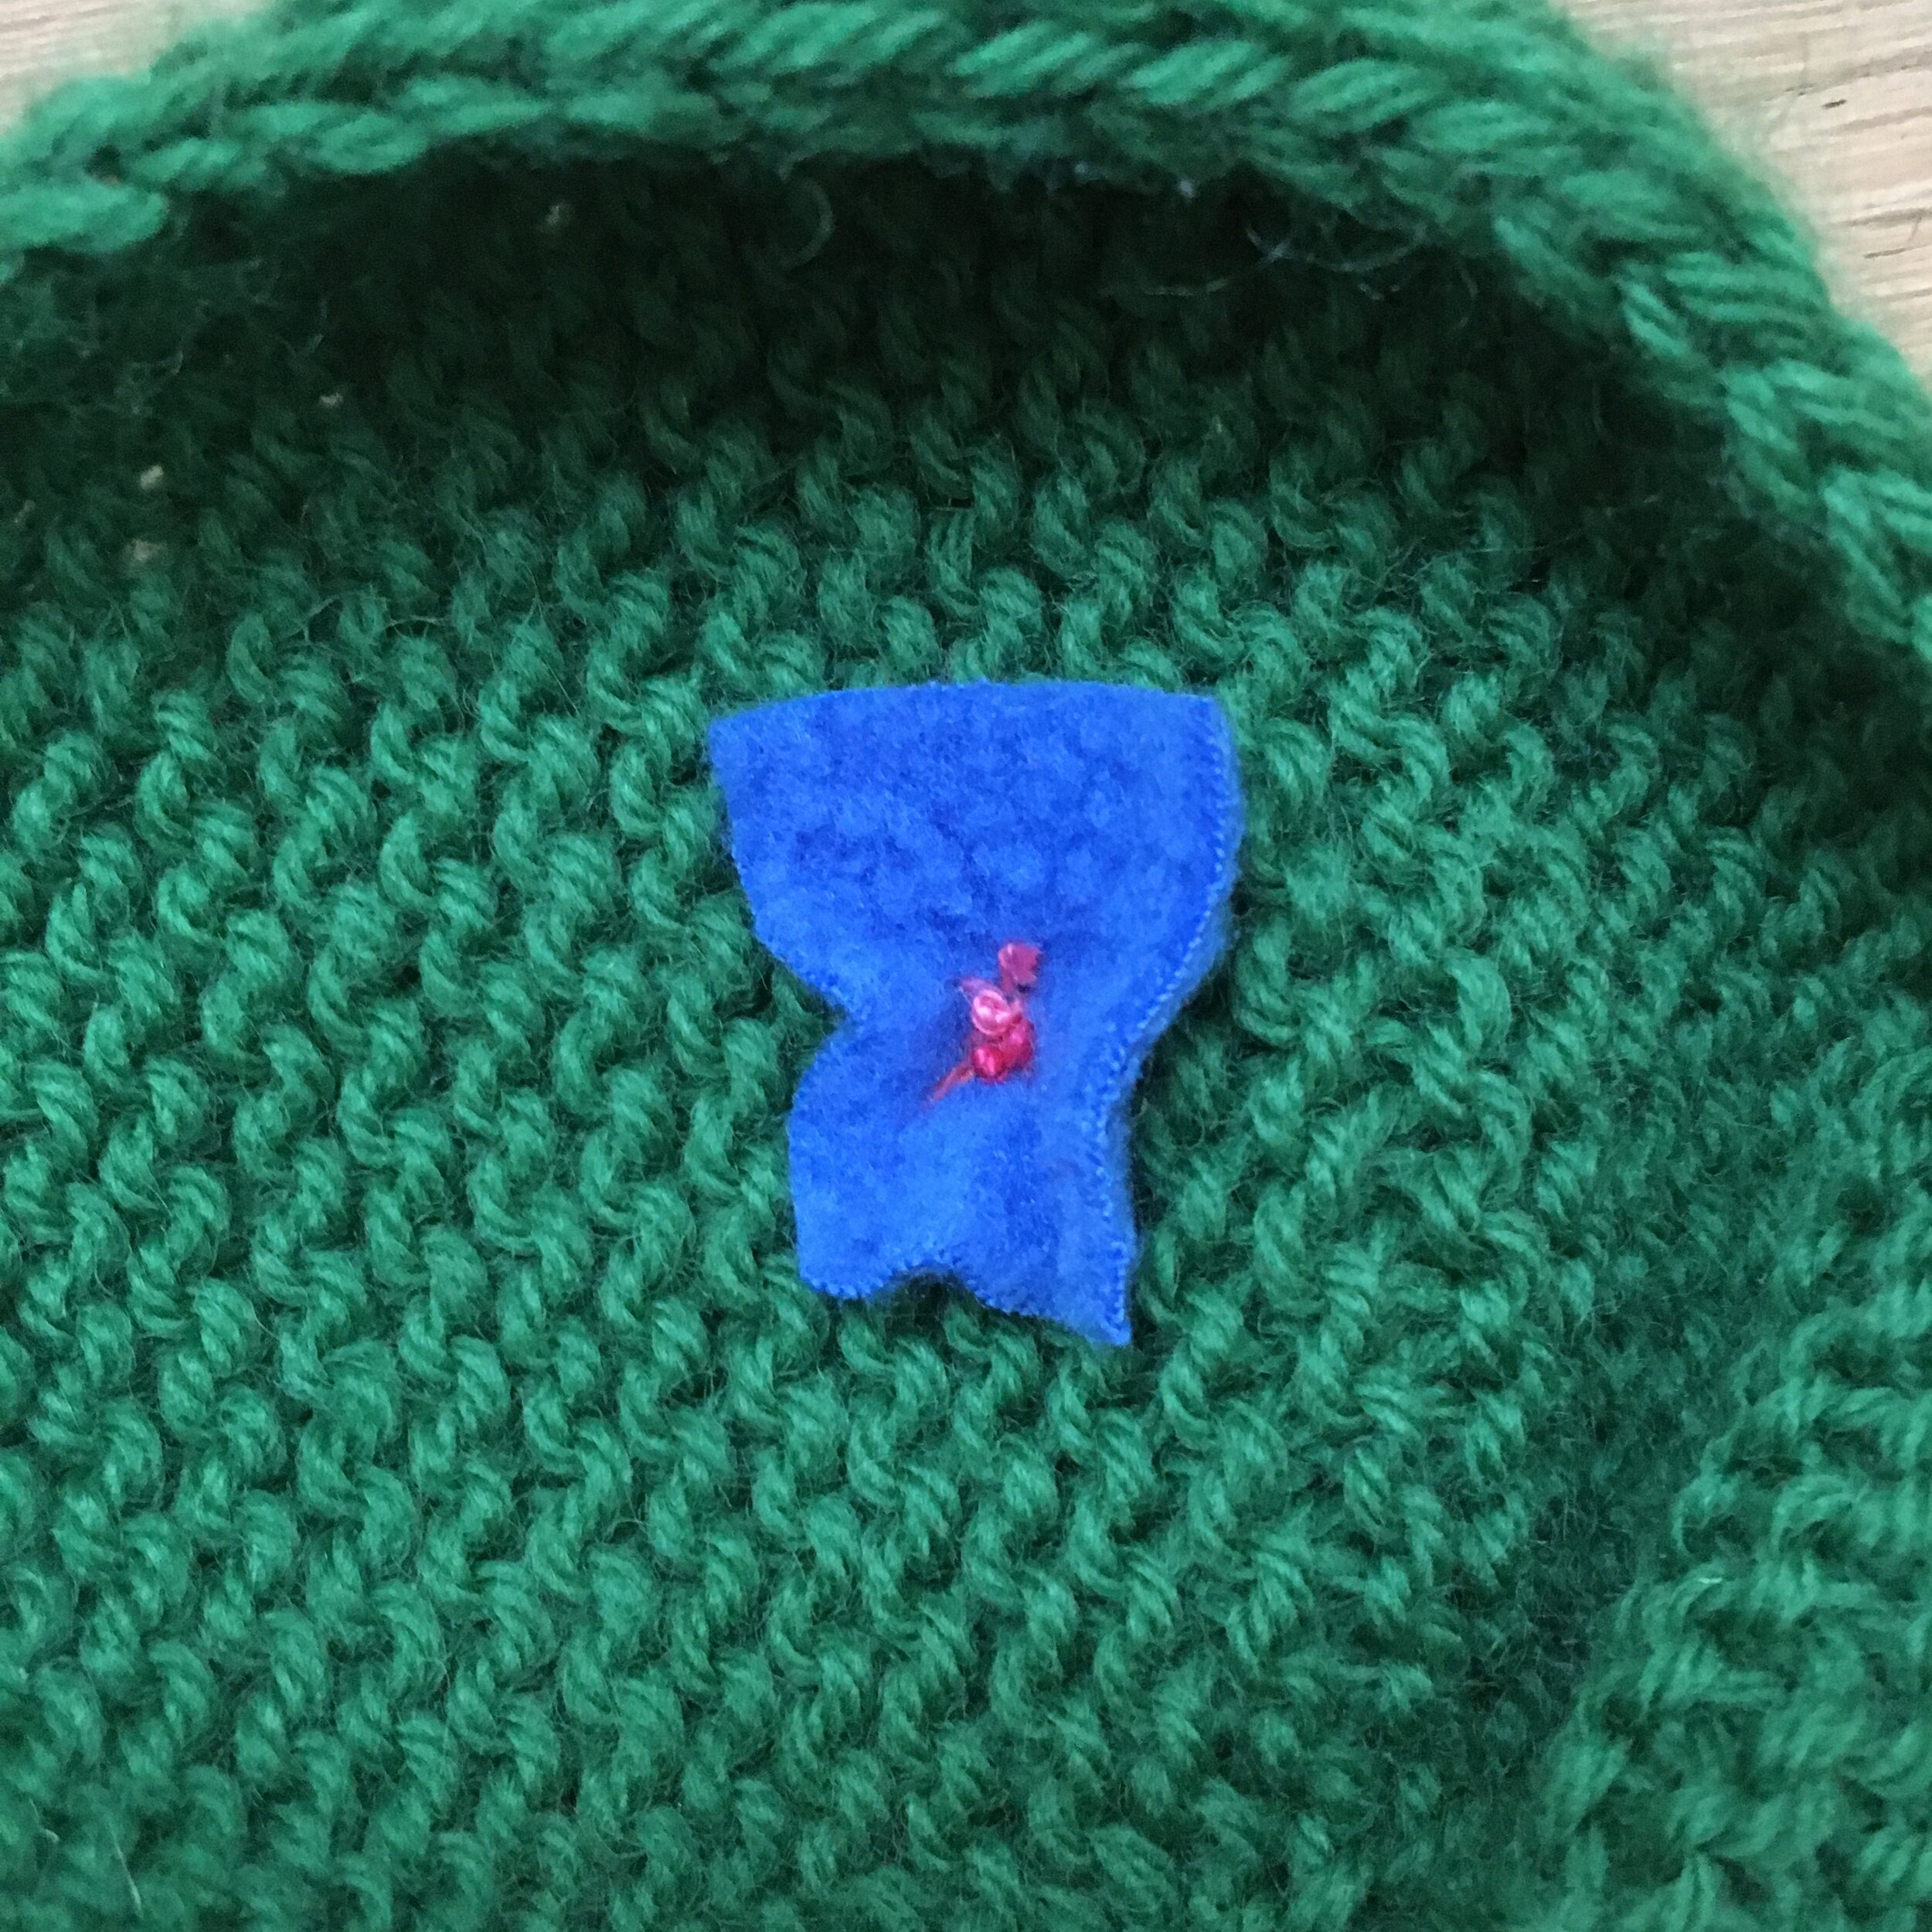
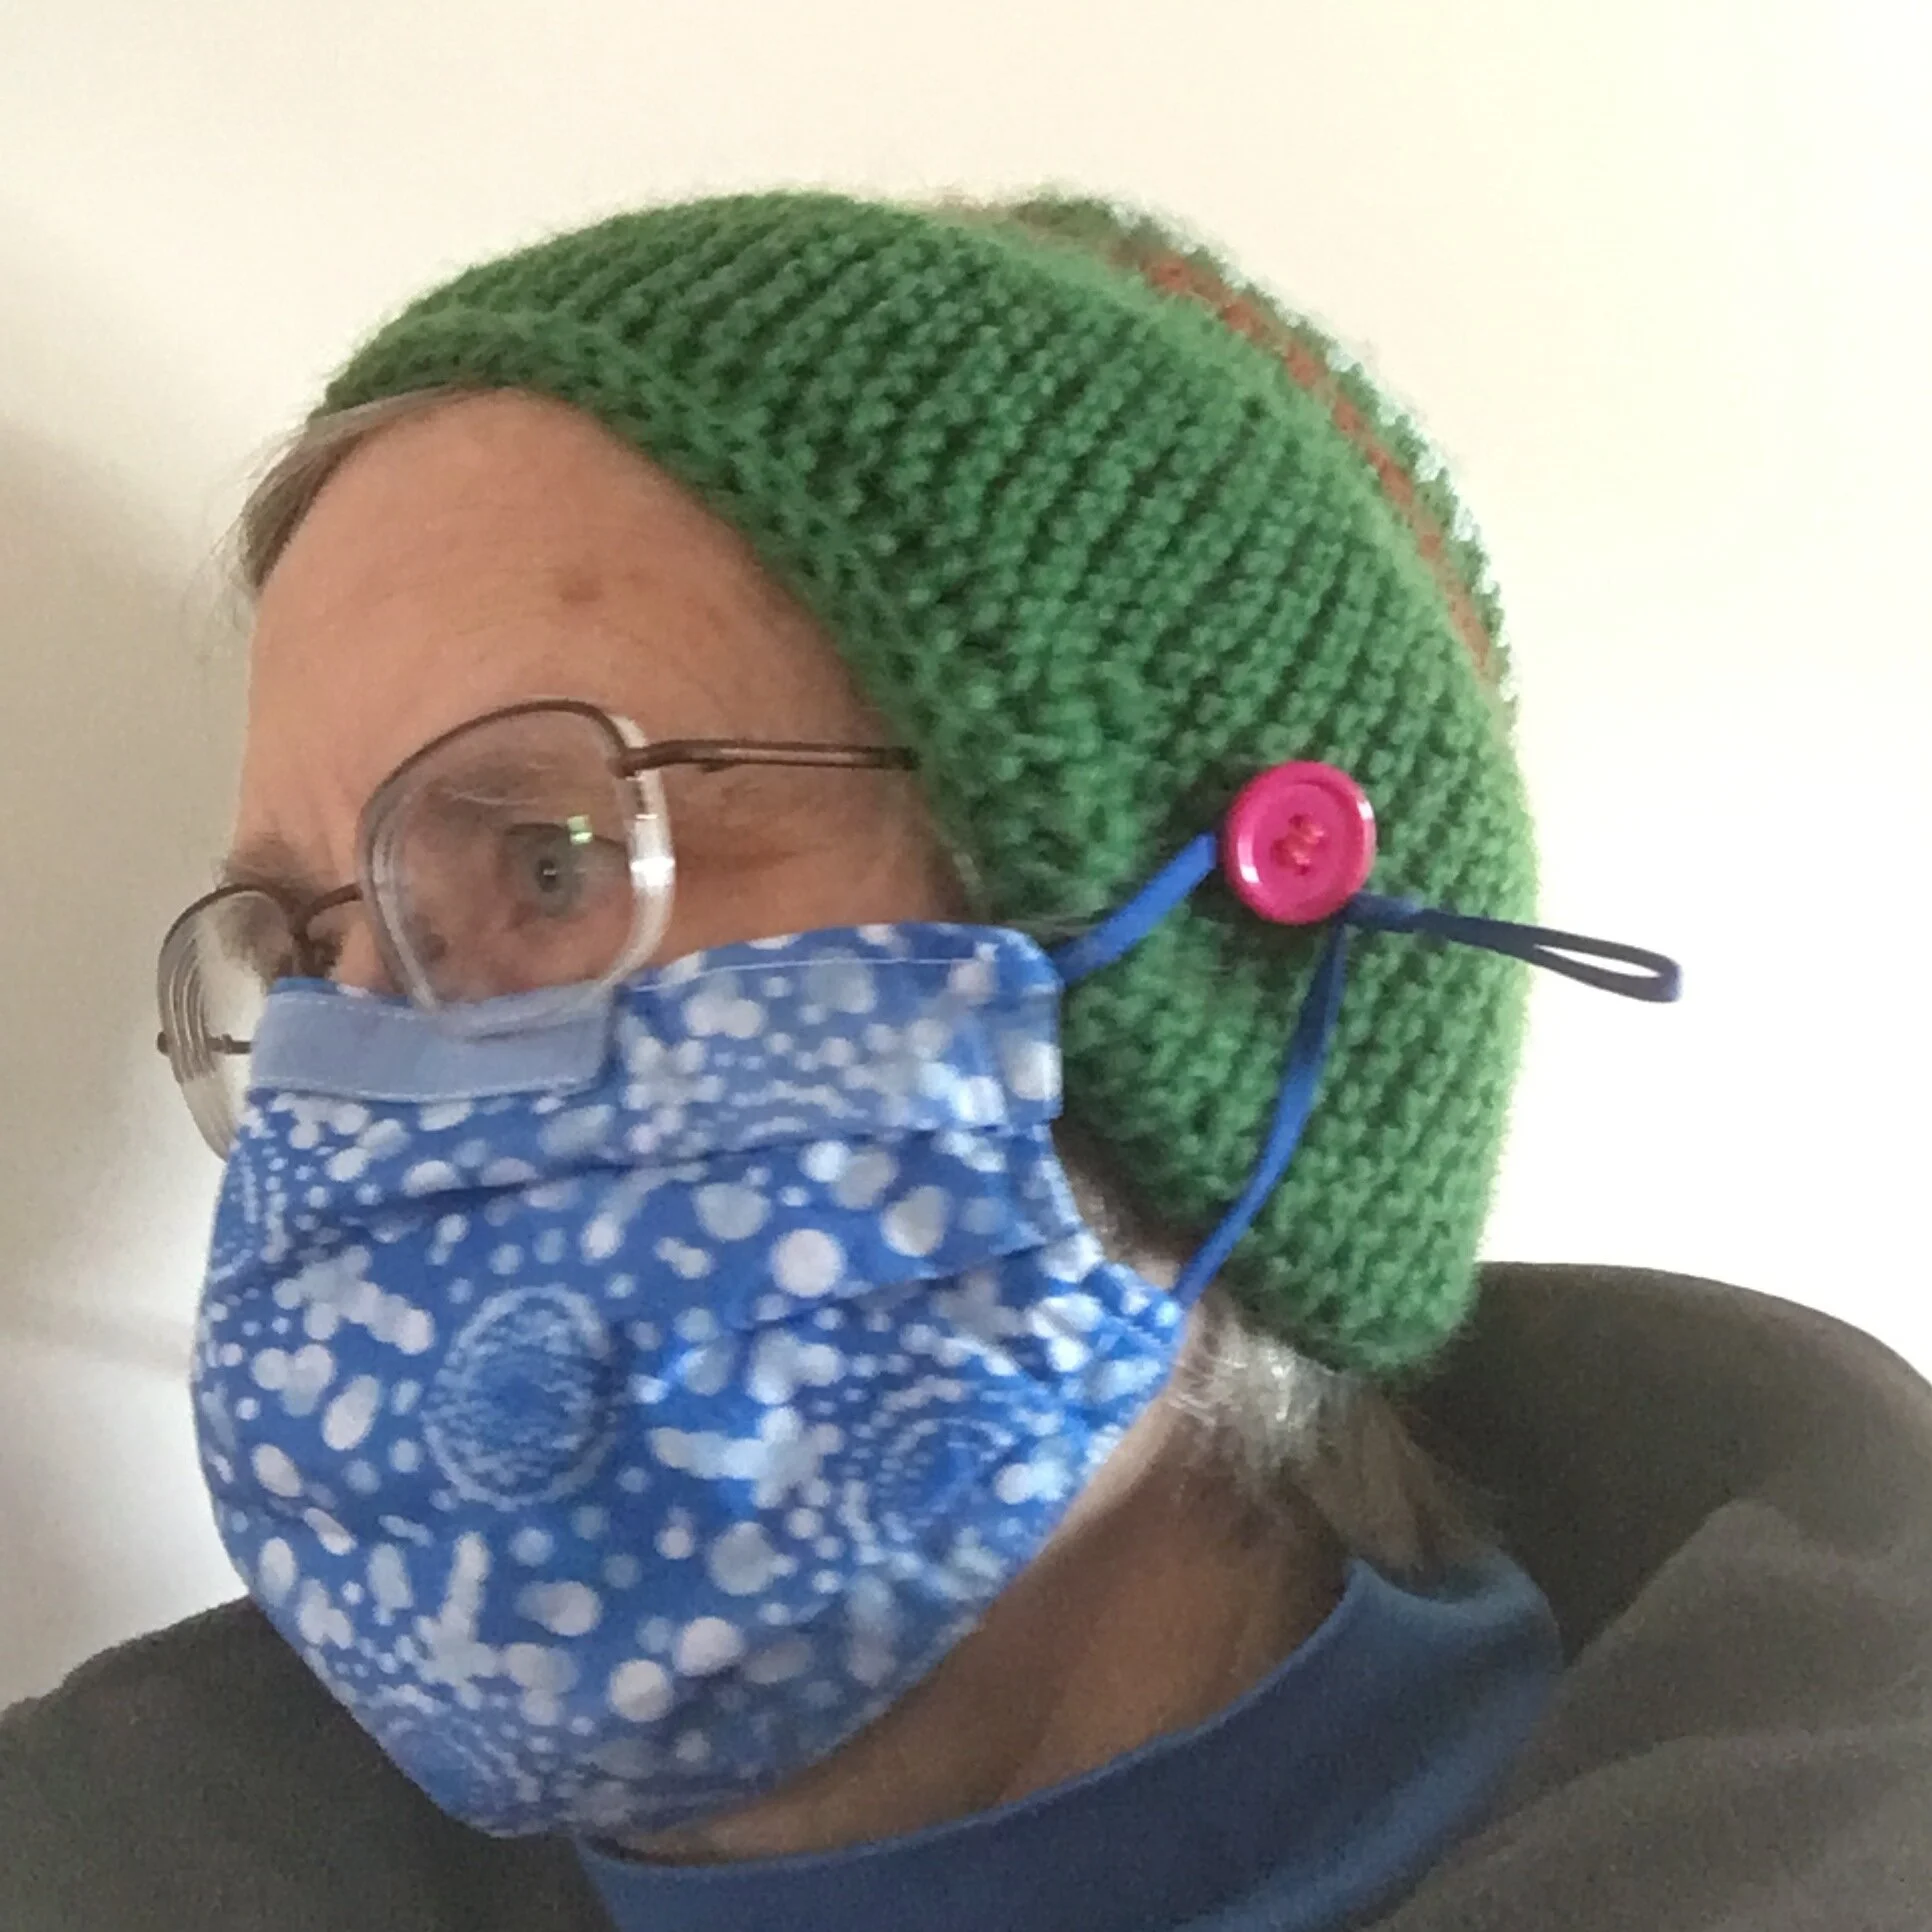
I don’t like have the loops of my face masks around my ears, so have sewn big buttons on my hats and slip the mask loops around the buttons. It works very nicely.

I sewed the buttons on with a square of fleece on the back to keep the knitting from getting pulled out of shape. I need to move the buttons up and back a bit now—as I’ve worn the hat, it has settled down on my head more. But that’s an easy fix.

B89D0447-A1EC-4B2B-A780-EE5A2E1BC627.jpeg
37EACA3A-92B5-46AC-8FF1-9CB2CB7835D6.jpeg

The pattern on Raverly for this hat is free, but Roberta suggests that you knit a few of these hats for a local elementary school. This is a great idea. And it’s perfect for me. I volunteer at Rose’s Bounty Food Pantry and we have a food program for children at a school in one of the other neighborhoods in Boston. We provide food once a week, but we also knit them hats and mittens and we’ve sponsored a new coat drive for the past two years for the children’s in our food pantry program. I only have worsted wool yarn in my stash and as a kid I wouldn’t have worn a wool hat. So I’ve some acrylic yarn which should be here soon.

Hat from the front

Hat from the front

If you are looking for a hat pattern that will keep your ears warm, give this pattern a try! I think it is great!

TAGS: Knit Winter Hat which covers the ears, Knit Winter hat


January 7, 2021

Quilt-in-a-Box Completed Quilt Top

by Judy Tucker


Quilt-in-a-Box Quilt Top

Quilt-in-a-Box Quilt Top

Quilt-in-a-Box Quilt Top

Quilt-in-a-Box Quilt Top

Back in November I told you about our guild’s 2019-2020 Quilt-in-a-Box project. Here, finally, is the quilt top with all the blocks that quilt members made with the fabrics in my box.

I pulled the yellow leaf print from my stash. It had been there for years—clearly just waiting for this project. The yellow really is cheerful and somehow ties it together perfectly.

I have some solid bright yellow fabric which I might use for the backing. But I’m still thinking about that.

I’m so pleased with how this quilt turned out!

Our guild still isn’t meeting due to the pandemic, but were are starting a mystery quilt. Stay tuned. I think there I might be seeing some sails on the horizon!

TAGS: Quilt-in-a-Box, Guild Quilt Project


December 31, 2020

Gnome Improv Quilt

by Judy Tucker


Gnome Improv Lap Quilt 39 x 54 inches, with my field Springer

Gnome Improv Lap Quilt 39 x 54 inches, with my field Springer

Gnome Improv Lap Quilt 39 x 54 inches, with my field Springer

Gnome Improv Lap Quilt 39 x 54 inches, with my field Springer

Last finish for 2020! This is my gnome improvisational quilt.

I was given one yard of the gnome fabric by a friend earlier this year. I purchased the white on white snowflake fabric, the hot pink star fabric,the binding and the backing, but I think everything else came out of my stash.

I fussy cut out as many gnomes as I could, and then started sewing on scraps and other pieces of fabric which I cut to fit. Sometimes I sew slabs—12 x 12 inch improv blocks to make a improv quilt. I started to do that with this one, bur realized it was going to be a full size quilt…and that wasn’t what I wanted. So instead I took the blocks I’d started and turned them into sections which I sewed into strips in a variety of widths. The quilt turned out to be exactly the size of a crib batting. I hadn’t planned it out, but that was just perfect!

The back of the quilt is a flannel plaid.

The Gnome Improv quilt is quilted with a mix of swirls on the white snowflake blocks and meandering or loops on of the rest of the quilt.

The gnome on the label is wearing a mask made from the selvedge of the gnome fabric! It is 2020 after all!

Happy New Year!!

GnomeImprovQuiltLabel.jpg


TAGS: Gnome Improv quilt, Gnome Quilt, Improv quilt


December 24, 2020

Batik Christmas Ornament Quilt

by Judy Tucker


Batik Christmas Ornament Four Patch Lap Quilt

Batik Christmas Ornament Four Patch Lap Quilt

Batik Christmas Ornament Four Patch Lap Quilt

Batik Christmas Ornament Four Patch Lap Quilt

Every other Thursday evening at 6:00PM EST, Bits ‘n Pieces Quilt Shop in Pelham, NH has a live on-line sale on Facebook. The blue and white ornament batik, the dark blue and the white on white snowflake fabrics were a set of fabrics I purchased up on one of these sales. (I added the green accent on the front and used the same green for the back).

I had so much fun with the “Four Patch for the Fourth” quilt pattern I designed, that used it again for this lap Christmas lap quilt. It works up really quickly and I like the design.

I had quite a bit of fabric leftover after I finished piecing this quilt, so I went back to my EQ8 quilt program and tweaked the design for the next time! That’s one of the great thing about designing quilts on a computer!

Instead of the diagonal quilting I did in the Fourth of July quilt, I echoed the squares in the design. I like it both ways!

Lilliebelle, a newborn size Waldorf type Doll I made earlier this year, is enjoying this quilt in the rocking chair.

Lilliebelle, a newborn size Waldorf type Doll I made earlier this year, is enjoying this quilt in the rocking chair.

If you celebrate, Merry Christmas! Hope you have a lovely time with friends and family this year!


TAGS: Christmas Quilt, "Four Patch for the Fourth" quilt, "Four Patch for the Fourth" Christmas variation, Lap Quilt, Batik Christmas Ornament quilt, Batik Christmas quilt.


December 17, 2020

"Waldorf Dangly Dell" Doll, from a Little Oke Dolls Pattern

by Judy Tucker


“Waldorf Dangly Dell” designed by LIttle Oke Dolls

“Waldorf Dangly Dell” designed by LIttle Oke Dolls

“Waldorf Dangly Dell” designed by LIttle Oke Dolls

“Waldorf Dangly Dell” designed by LIttle Oke Dolls

A few months ago, I decided I wanted to make a Waldorf doll that was safe enough to give to an infant. That meant no soft stuffing in the body which might present a suffocation risk. I thought about designing a pattern but then decided to see if there were some good patterns out there. This “Waldorf Dangly Dell” pattern by Little Oke Dolls which I found on Etsy.com was my favorite!

The doll has the typical tightly rolled wool roving head, and just a bit of stuffing in the hands and feet. The arms, legs and torso of the doll are empty. That meet my safety criteria!

The doll is well named…it really is dangly!

1D86136E-AE96-43D2-A213-E575F1615609.jpeg
6FB7ABA6-705F-4241-9527-3FEF9764ECB3.jpeg

Here’s the first Dangly Dell I made, earlier this year. Her feet are gathered, but they don’t have any stuffing in them, which is what the pattern specifies.

"WaldorfDanglyDell"inPink.jpg

This Waldorf dolls make great baby presents and are quite easy to make. The pattern is excellent and fully illustrated. If you’ve never made a Waldorf doll, but have always wanted to, this is a great pattern to start with.

TAGS: "WaldorfDanglyDell"doll, Little Oke Dolls "WaldorfDanglyDell"doll, First Waldorf Doll, Waldorf Doll for a baby, Simple Waldorf Doll, Waldorf Doll "lovey"


December 10, 2020

Forest Animals Winter/Holiday Quilt

by Judy Tucker


Forest Animals Lap Quilt

Forest Animals Lap Quilt

Forest Animals Lap Quilt

Forest Animals Lap Quilt

The forest animals are getting ready for the Winter Solstice! You can see how low the sun is in the sky in this photo taken mid-morning!

This was a quilt kit I picked up on sale. It is a past season fabric designed by Cori Dantini call “Winter News” from Blend Fabrics. The pattern is their Menagerie Quilt Pattern which can be used with other Blend Fabric designs. The kit had all the fabric needed to make the quilt, including backing and binding. That’s fairly unusual. All I had to add was the batting. Except….I modified the pattern and substituted the solid light green for the grey branch and berry fabric seen in the center row sashing. It’s beautiful fabric but just a bit too grey for me at this time of year!

I also deleted the top and bottom border on the quilt, making my quilt linear, with a more modern feel.

The backing is a wood-grain fabric. There were 3 yards of fabric in the quilt, plenty to make the back. But the wood grain would have being horizontal and I wanted it to be vertical. So I added a strip of left over animal fabric to make the backing wide enough, and I have enough food grain fabric left to back another little quilt. That’s a win-win!

You can see the wood grain backing here in the lower left corner.

You can see the wood grain backing here in the lower left corner.

Here’s a close up the fabric. Look carefully in the light blue fabric to see some forest animals hiding in the underbrush! So much fun!

CloseUp"WinterNews"Fabric.jpg


TAGS: Quilt using Menagerie Quilt Pattern by Blend Fabrics, Winter Quilt, Christmas Quilt, Winter Holiday Quilt, Forest Animals Quilt


December 3, 2020

"Tula's True Colors" Completed Charm Squares with Circles Quilt

by Judy Tucker


Completed “Tula’s True Colors” with Circles Quilt.  (That’s my 12 yr old Springer. He used to feel entitled to photo-bomb all my pictures but he rarely does now, so I decide to celebrate the moment and didn’t crop him out this time)!

Completed “Tula’s True Colors” with Circles Quilt. (That’s my 12 yr old Springer. He used to feel entitled to photo-bomb all my pictures but he rarely does now, so I decide to celebrate the moment and didn’t crop him out this time)!

I posted this quilt top made with two 5 inch charm packs of “Tula’s True Colors” by Free Spirit Fabrics back on August 20th. Here, finally, is the finished quilt. It sat on the shelf for quite a while as I thought about how to do the quilting.

One option was to quilt concentric circles around each of the circles on the quilt. Eventually the circles would intersect, like ripples in a pond. (Click this lint to see this in the quilting on my “Portholes” quilt). This quilt is small enough that it would be doable, but my appliqued circles patches just aren’t picture perfect, so I couldn’t justify all the hours of quilting that would take.

I ended up quilting down the rows, just next to the seam in a row, and then sewing around the circle if there was in the row I was stitching. It was like driving in a road with a rotary….sew straight until you reach the circle, sew half way around that circle and then sew on out when you’ve reached the seam straight across from the seam you’d be sewing on.

It’s a bit hard to see, but there is one row of quilting around the left side of this circle and two rows around the right side.

It’s a bit hard to see, but there is one row of quilting around the left side of this circle and two rows around the right side.

"Tula'sTrueColors"CharmSquareQuilt.jpg

Where the circles didn’t intersect a seam I simple sewed around the circle, about 1/8 inch from the appliqued circle edge.

This quilt is just so cheerful. And I love Tula Pink’s “Fairy Dust” design in the “Whisper” colorway from this line on the back of the quilt…you can see it peaking out in the photo above, with the sparrows flying among the tiny stars. It’s probably my favorite design in this line.


TAGS: "Tula's True Colors" 5 inch charm square quilt, Quilt Using "Tula's True Colors" by Free Spirit, Quilting around Circles, Quilting circles, Charm square quilt


November 26, 2020

"Hello!" Strip Baby Quilt

by Judy Tucker


“Hello!”, a small baby quilt.  I love the vegetables and bulbs that are visible under street level in the design!

“Hello!”, a small baby quilt. I love the vegetables and bulbs that are visible under street level in the design!

“Hello!”, a small baby quilt.  I love the vegetables and bulbs that are visible under street level in the design!

“Hello!”, a small baby quilt. I love the vegetables and bulbs that are visible under street level in the design!

I’ve been waiting for just the right baby for this Moda© fabric named “Corner of 5th and Fun” designed by Sandy Gervais. It’s not a current fabric, but there is still some of the fabric line available if you look. I had a border print and two coordinating fabrics in my stash, but only used two of the fabrics in this quilt.

I cut the border print into strips, taking out some of the sky between them. That gave me 3 inch wide strips of slightly cream background fabric I could use in the quilt.

That 3 inch strip of background determined the size of my pinwheel blocks. I used a variety of color- coordinating scraps in my stash to create the 14 little three inch finished pinwheels blocks.

This is a strip quilt, created with 7 sections—two borders, 3 panels pieces and two sets of pinwheels.

I mixed quilting techniques, using my walking foot on most of the sections and free motion quilting on the three panel sections. I liked the kites in the long-arm quilting design what was used on my “Post-Cuts” quilt, so decided to put kites in the free motion quilting in the sky of the village panels. I practiced the kites drawing them by hand first and then looked at the professional long-arm kites. My kites were stitched slightly differently and that’s what I stuck with. My theory is that is always best to stitch free motion designs you can draw rather than try to copy someone else’s! Everyone’s motor skills are different and you need to go with what you body can do.

Here is one of my kites.

My doodled free motion kite design

My doodled free motion kite design

The backing can out of my stash of mushroom fabrics. It was printed 10 years ago. I think that makes it a modern vintage fabric! I love the stripes on the stems of these mushrooms, and that the back picks up the idea of mushrooms seen in the border print.

Vintage mushroom fabric backing

Vintage mushroom fabric backing

This new baby is part of an extended family which has still has baby quilts I made over 40 years ago! Hopefully the new generation will enjoy their quilts just as long!

TAGS: Baby quilt, Strip quilt, Pinwheel Blocks in a Strip Quilt


November 19, 2020

Advent Calendar Fold-Up Fabric Panels

by Judy Tucker


Advent Calendar from a fabric panel 23 x 23 1/2 inches

Advent Calendar from a fabric panel 23 x 23 1/2 inches

Advent Calendar from a fabric panel 23 x 23 1/2 inches

Advent Calendar from a fabric panel 23 x 23 1/2 inches

This has to be one of my favorite fabric panel projects of the year. These two advent calendars were both simple fabric panels. When the lower half is folded along the lines marked on the fabric, the folds create numbered pockets.

The panel above is “Christmas Wonders” by stofffabrics.com. It is a Danish design. I love how the number on the calendar are all jumbled, just like the numbers on the European paper advent calendars.

Here is the other panel I used. “Winterland” by Antoana Oreski for Northcott Fabrics. If you click the link you can see the panel before it was folded. (I was so excited, I forget to snap a photo before I got to work)!

Fabric Panel Advent Calendar 21 1/4 x 22 1/4 inches

Fabric Panel Advent Calendar 21 1/4 x 22 1/4 inches

This calendar has the number on the pockets all in order!

I machine quilted between the pockets and hand quilted the scenes at the top of each calendar.

I’ve been thinking about what could be put in the Advent calendar pockets. The pockets are a good size (2 1/2 x 3 inches on the upper one and 2 1/2 x 2 1/2 inches on the bottom one). My favorite idea is a mishmash of things. An occasional piece of candy, a card listing an item to give to a food pantry, instructions for a Christmas craft or a letter or a drawing to send to a family member who isn’t part of your household. I also think it would be fun to add some pre-Christmas “chores” such as decorating the tree, baking Christmas cookies, tidying up the toy shelf and deciding which toys have been outgrown or no longer played with that might be donated, even cleaning the child’s bedroom!

Both these fabric panels are from prior years, but you can probably find them by searching their titles. And there are other panels available which are current.


This is such a fun project and it will become a family heirloom with endless possibilities for what can be tucked in each pocket, counting down the days until Christmas!


TAGS: Fabric Advent Calendar, Fold Up Panel Advent Calendar, Reusable Sewn Fabric Advent Calendar, Quilted Advent Calendar from a Panel


November 12, 2020

Quilt-In-A-Box Blocks Made for My Box

by Judy Tucker


IMG_4425.JPG
IMG_4425.JPG

In my last post I told you about our Quilt Guild’s year-long Quilt-in-a-Box project. We were able to met in a member’s driveway and do a socially distanced box swap…the final one. Yes, we have our own boxes back now. This is SO exciting. Some folks have already put their tops together!

A friend, who wasn’t in my box rotation (nor I in hers), decided to do a couple more swaps between us. I made her my propeller block and two others, and she made me her house block which she made for all the boxes, and the schooner block. I had made I block that I wasn’t happy with before settling on my propeller block, so we both ended up with a total of 12 blocks.

We spent an afternoon laying out blocks on her picnic table, thinking about how we are going to assemble our blocks. I have so many log cabin blocks, that I think I am going to try to put this quilt together is some sort of log cabin variation. At least, that sounds good on paper.

I have some holiday sewing to finish up before I tackle this quilt, so it will be a while before I have a pieced top. But I’ll post it as soon as I have it done!

IMG_4430 2.jpg
IMG_4431.jpg
IMG_4422.jpg
IMG_4436.JPG
IMG_4414.JPG
IMG_4435.JPG
IMG_4417.jpg
IMG_4418.jpg
IMG_4429.JPG
IMG_4415.jpg

TAGS: guild project, block swap, Quilt-in-a-Box


November 5, 2020

Quilt-in-a-Box Blocks I Made for The Guild Member Boxes

by Judy Tucker


This is the “Propellor” block I made for my own box

This is the “Propellor” block I made for my own box

This is the “Propellor” block I made for my own box

This is the “Propellor” block I made for my own box

Last fall, our quilt guild, Proper Bostonian Quilters, started a Quilt-in-a-Box project. Each member was given a pink plastic project box and asked to place enough fabric in the box to make 9 blocks. Everyone participating chose one block to make all year. Each month the box was passed to the next name on a box and you made your block with the fabrics in that box. Then you passed it to the person on the list at the next month’s meeting. The goal was to have 9 blocks done by April so that the folks could make a quilt top by the last meeting in June. But then COVID-19 arrived, one block before the box round was completed. So the boxes stopped their rotation.

Finally, at the very end of September, we did a final swap for the final block outside in a member’s driveway.

The block I put in my box of fabric is called “Propeller” and it is the block show at the top of this post. Here are some of the other “Propeller” blocks I made using the fabrics chosen by other members for their own boxes. There is quite a diversity of fabrics in each person’s box.

IMG_2285.jpg
05E8C772-B756-4B33-BD41-BFB44EF6128C.jpeg
9BAD6FED-A669-4015-B6F2-E85B3CBB3FBB_1_201_a.jpg
A3380C69-0BE5-4710-B2F8-D17A3FFB7ED3.jpg
EE001A1E-C591-411D-BEF9-5ABA4C474A4D_1_201_a.jpeg
E8A1137D-819C-4A8B-AEF8-DC06EC5ACC9E_1_201_a.jpeg
IMG_4329.jpg
66F2809B-1A12-484F-8BB1-6548F62EF2A3.jpg

I’ll show you the completed blocks in my box when I get them back. I can’t wait to see what folks did with my set of fabrics!

This is a really fun guild project, it just takes a bit of organization on the front end and the commitment of members to bring the box and their completed block to each meeting.


TAGS: Quilt-in-a-Box, Guild Quilt Project, Block swap


October 29, 2020

"Dream Big" Panel Color Study

by Judy Tucker


“Dream Big” Panel Color Study  43 x 45 inches

“Dream Big” Panel Color Study 43 x 45 inches

“Dream Big” Panel Color Study  43 x 45 inches

“Dream Big” Panel Color Study 43 x 45 inches

Back in 2014 I started writing some color study posts. (Look above at the top of the page for a gallery of some of studies). The first post color study featured complimentary colors in a quilt I called “Crosses and Losses”. Here is a picture of the finished “Crosses and Losses” quilt. Since they I’ve done a number of color study quilts.

This is my latest color study a quilt It’s also another of this year’s panel play quilts. This panel is a digital print by Hoffman called “Dream Big-Fire”

I like the way that complimentary colors (those directly opposite each other on the color wheel) can create a visual vibration. The “Crosses and Losses” quilt really vibrates! Almost too much. Yellow and blue are complimentary colors. The complimentary color for orange is teal. So blue isn’t the true compliment of the colors in this flower….it’s off by one position on the color wheel. But it does create a visual vibration.. So I’m happy with my choice.

Here is the original panel.

"DreamBig"panelbyHoffman.jpg

I cut the panel horizontally in 2, 3, 4, 5, 6, 7, 8 and almost 9 inch strips. I sewed the medium blue strips cut at 1 1/2 inches between each of the panel strips.

A quilt with just the horizontal strips would be a great place to stop. I really like it with just these blue strips.

"DreamBig"PanelwithPerpendicularStrips.jpg

But I carried on. I cut the panel again in strips using the same widths as above, only cutting this time across the new piece vertically. I had enough Kona© Cotton blues to create a gradient of blue strips, starting with white. These strips are slightly narrower, cut at 1 1/4 inches.

Here’s the back. The orange and blue theme continues! This Connecting Threads orange leaf fabric has been in my stash for years. I glad it’s finally found a perfect home!

"DreamBig"QuiltBack.jpg

Orange and blue! Another really bright quilt for 2020! It’s perfect for October! Maybe I should call it “Pumpkin Spice’! (Or maybe not)!!

(Note the run of gradient blues I put in on the binding)!

TAGS: Quilt made using Hoffman "Dream Big" Panel, Color study, Color Study Quilt, Complementary colors--almost!


October 22, 2020

Gnomekin KIt from Teach Wonderment and Paper Mushroom Template from Low Poly Crafts

by Judy Tucker


Gnomekins from the kit by teachwonderment.com

Gnomekins from the kit by teachwonderment.com

Gnomekins from the kit by teachwonderment.com

Gnomekins from the kit by teachwonderment.com

With the holidays coming in the not-too-distant-future, I want to tell you about the “Gnomekin” kit by teachwonderment.com

This kit comes in a basic form and the one I purchased and linked above. The complete kit has much of what you need to make one gnomekin figure. However you will need some additional supplies including non-toxic paint, tiny buttons from their bags, and needles and thread.

I purchased my kit and 2 extra gnomekin pegs from A Child’s Dream. The gnomekin with the orange coat was made using the original supplies from the kit. He got both a shoulder bag and the gathered bag. His hands are bigger than the tiny round wooden beads I had in my stash. I do like the bigger hands better! If you need additional supplies, A Child’s Dream carries non-toxic watercolor paint and beeswax polish, as well as wool felt, wood beads, pipe cleaners and wool roving in a variety of colors if you wish to make multiple gnomekins.

I added the buttons to the gnomekins coats and the red hat and dug into my stash for wool felt for the two extra gnomes. I embroidered the hats of two gnomekins. I didn’t use the heart shaped piece of wood in the kit that was supposed to be his feet and would add stability. None of my peg dolls have feet, so I just skipped that final step but it is a cute detail.

The instruction booklet is great. I found the coat and hat patterns to be a bit too big. I cut 1/8 inch off both those patterns. However, if a child is going to sew the clothes, leave the pattern pieces as is, unless he/she is able to stitch the narrow 1/8 inch seam indicated on the pattern.

The pattern calls for use of a glue gun but I used craft glue and that worked out well too. It just requires a bit more patience since it is slower to set up. However, craft glue allows for some adjustments which the hot glue does not. For that reason and for safety. I always use craft glue for my peg dolls.

4014C5B5-3123-4F35-81DC-2520256A4C41.jpeg
220DA9AD-72B2-4510-9D5D-82DDFC559E23.jpeg
AA1A55A9-7A66-462C-88AE-91E308871ACA.jpeg

The paper mushroom is a free download from lowpolycrafts.com. I didn’t have any red card stock paper that was heavy enough, so I used white card stock and colored my mushroom with colored pencils. An older school child who likes origami or is good with their hands could easily construct this paper mushroom. All you need is card stock, craft glue, and a small pair of sharp scissors, and maybe a tool to score the fold lines.

So, two great kits you can make now to get ready the Winter Holidays!

Safety Note: No not give the gnomekins to a child under age three years. They have small pieces which are choking hazards.

Notice: This blog is not monetized: I do not use affiliate links. When there are links in a post, they are to give credit to another creative person, because I like or have used a product, or to help the reader easily find supplies for a project.

TAGS: Gnomekin kit from Teach Wonderment, Free paper mushroom pattern from Low Poly Crafts, A Child's Dream


October 15, 2020

© Disney and Thomas Kinkade Studios Quilt Panel Throw (or Cat Mat!) Completed

by Judy Tucker


IMG_7273.JPG
IMG_7273.JPG

So here’s my completed ©Disney and Thomas Kinkade Studio Mickey and Minnie Sweetheart Campfire Panel by David Textiles.

This is very simple treatment for a quilt panel. I just added two borders and put tiny quilt blocks in each corner of the outer border.

I really do expect this will end up being a cat mat I chose a thick polyester batting and Cuddle Fleece on the back. That made this a bit hard to quilt. I ended up following some of the design in the panel rather than trying to do an all-over quilt design. It’s really more tacked together than actually quilted. That’s not something I would normally do, but with the polyester batting and Cuddle Fleece back, I think that will be fine.

Here’s a close up of the “Kitty Cornered” block also known as a corner beam block. (I didn’t pick the block for it’s name, but it certainly is the perfect choice for a cat mat)!

“Kitty Cornered” Quilt Block, also called a corner beam block

“Kitty Cornered” Quilt Block, also called a corner beam block

I made this block using the Creative Grids® “Kitty Cornered” ruler. It makes two corners at one time. There is a great video showing how to use the tool at this link and the presenter shares a number of quilt patterns that utilize this block.

I think a couple of my friend’s cats will be very happy napping on the Cuddle Fleece side of this panel come winter. There’s plenty of room for both of them to stretch out together. Though I’m not sure these two do that!

Notice: This blog is not monetized: I do not use affiliate links. When there are links in a post, they are to give credit to another creative person, because I like or have used a product, or to help the reader easily find supplies for a project.

TAGS: Quilted Cat Mat, Kitty Cornered Quilt Block, Kitty Cornered Quilt block, Creative Grids® Kitty Cornered Quilt Ruler, Corner Beam Quilt Block


October 8, 2020

© Disney and Thomas Kinkade Studios Quilt Panel Collaboration

by Judy Tucker


©Disney. ‘Mickey and Minnie Sweetheart Campfire” quilt panel:  Thomas Kinkade Studios for Four Seasons Division of David Textiles Inc.

©Disney. ‘Mickey and Minnie Sweetheart Campfire” quilt panel: Thomas Kinkade Studios for Four Seasons Division of David Textiles Inc.

©Disney. ‘Mickey and Minnie Sweetheart Campfire” quilt panel:  Thomas Kinkade Studios for Four Seasons Division of David Textiles Inc.

©Disney. ‘Mickey and Minnie Sweetheart Campfire” quilt panel: Thomas Kinkade Studios for Four Seasons Division of David Textiles Inc.

I’ve been on a bit of a detour detour on the blog, but this was definitely my summer of using quilt panels!

This digitally printed panel is the ©Disney. “Mickey and Minnie Sweetheart Campfire” painted by the Thomas Kinkade Studios for Four Seasons Division of David Textiles Inc.

I have a friend who is huge Thomas Kinkade fan and I just couldn’t resist making something for her with this amusing panel!

Its a big panel—35 x 43 inches. I think all it is going to need is a couple borders and a binding. I thinking lavender and a couple orange fabrics This little quilt or wall hanging (or cat mat!) should should absolutely be a bit silly!

Making the top should be straightforward. Right now, I’m still thinking about how I am going to quilt it. That’s going to be the challenge on this piece!

TAGS: "Mickey and Minne Sweeheart Campfire" panel from David Textiles Inc.


October 1, 2020

"Post-Cuts" Face Mask Scrap Quilt Completed

by Judy Tucker


“Post-Cuts”:  Queen Size Quilt  made from Face Mask Scraps

“Post-Cuts”: Queen Size Quilt made from Face Mask Scraps

“Post-Cuts”:  Queen Size Quilt  made from Face Mask Scraps

“Post-Cuts”: Queen Size Quilt made from Face Mask Scraps

It’s all done! Here is the quilt I made with scraps from the face mask I made this past spring.

I mostly sew rectangular pleated masks so I was left with lots of scraps that were 6 inch wide and of various lengths. The scraps were too big to toss, but were destined to languish in a bin if I didn’t do something with them ASAP. Hence this quilt! You can read more about my process in this May 21, 2020 post and the post that follows.

This is a really big queen quilt. When I finished piecing this quilt, I was still knee deep in making face masks and honestly couldn’t see quilting something this large on a domestic machine. So I sent it off to the good folks at Bits ‘n Pieces Quilt Shop in Pelham, NH. I’ve rented their computerized long arm quilting machines in the past. They weren’t renting machines when the quilt was completed, but were able to start renting again a week or two later. But this time, I was happy to let them quilt this for me.

I asked them to use a kite quilting pattern. I wanted this quilt to be a happy quilt, and to rise up and spin and twirl above it’s humble, and if I’m honest, it’s sad origins.

My only specification was for the quilting design to have “more kites than clouds” but gave the staff permission to choose the design and the thread colors.

They told me that they looked around and found this awesome kite design. They used a light green thread on the top of the quilt and a beige on the back. The kites turn in all directions so there isn’t really and up and down with the design.

204CE964-FAC1-4FC2-9280-7DE025B04666.jpeg
A547816E-354B-4127-AE5B-CD5027EB1FDB.jpeg

Bits ‘n Pieces did a great job with the quilting. The quilt came home to be trimmed and bound a few weeks ago…just before Fall arrived in New England. Perfect timing.

I’m so pleased with how this scrappy quilt turned out! It’s really a record of my pre-COVID 19 fabric stash and it makes me happy to see all the fabrics I’d collected over the years.

TAGS: "Post-cuts" scraps from making face masks, scrap quilts, Scrap quilt from face mask scraps, Bits 'n Pieces Quilt Shop, Bits 'n Pieces long arm quilting services


September 24, 2020

Jointed 9 inch Waldorf Doll

by Judy Tucker


9 inch jointed Waldorf type doll

9 inch jointed Waldorf type doll

9 inch jointed Waldorf type doll

9 inch jointed Waldorf type doll

Having made the jointed Dragon Baby, I decided to try making a jointed Waldorf type doll. I used the pattern for “Minnie” in Karin Neuschütz’s great book, “Sewing Dolls.”

I used internal plastic safety joints for the Dragon baby. This pattern called for leather or fabric “buttons”. The “buttons” are used on the outside of the joint to help fix the heavy duty thread that joins the joints to the doll’s body. I had some very thick wool felt that was almost the same color as the doll’s skin so that what I used.

Here’s the wool felt “button” I used for the shoulder joints

Here’s the wool felt “button” I used for the shoulder joints

The doll in the book looks like a toddler. My doll is much leaner, definitely a school age child.

And I tried another “first” with this doll. I “pinched” the her knees and elbows to give a more defined looking joint.

JointedWaldofDollUndressed.jpg
Yay!! Look at me! I can put my arms up!

Yay!! Look at me! I can put my arms up!

i’m glad I tried out this pattern. It didn’t turn out to look like the doll in the book, but that’s just fine. I like this doll just as much.


TAGS: Waldorf type doll, Jointed Waldorf Type Doll


September 17, 2020

"Kaleidoscope" Three Yard Pattern by Fabric Café®

by Judy Tucker


Fabric Café’s® “Kaleidoscope” 3 yard quilt.  44 x 56 inches.  Hanging on a neighbor’s fence in front of their sunflowers!

Fabric Café’s® “Kaleidoscope” 3 yard quilt. 44 x 56 inches. Hanging on a neighbor’s fence in front of their sunflowers!

Fabric Café’s® “Kaleidoscope” 3 yard quilt.  44 x 56 inches.  Hanging on a neighbor’s fence in front of their sunflowers!

Fabric Café’s® “Kaleidoscope” 3 yard quilt. 44 x 56 inches. Hanging on a neighbor’s fence in front of their sunflowers!

Last week I shared a quilt I entered into Bits ‘n PIeces Quilt Shop’s Three Yard Customer Quilt Challenge. Here is my 2nd entry. (Head over to Bits ‘n PIeces Facebook page to see all the quilts in the competition, and vote on your favorite).

This bright cheerful fabric line called “Sunny Fields” was just released by Clothworks. It was designed by Sue Zipkin. It was one of those fabrics…when I saw all those sunflowers on one of Bits ‘n Pieces Facebook unboxing videos I went right to the computer and purchased it!

The pattern is a three yard pattern by Fabric Café® called. “Kaleidoscope”. This is really a classic quilt pattern.

But there was a challenge with this fabric. The butterflies flutter in many directions but the flowers all are directional, standing tall on the fabric. But this is diagonal pattern. What to do? Try to get the flowers upright or just let them be jumbled?

"SunnyFields"in"Kaleidoscope". jpg

I thought about it while I was walking the dogs. It came to me that there was a way to get the flowers all going in the same direction.

One way that half square triangles are constructed is by placing two squares of fabric, right sides together. Then a line is drawn on the lighter fabric from one corner to the opposite corner, diagonally. A seam is stitched 1/4 inch on each side of the center line. Then the block is cut along the center line, yielding two half square triangle blocks.

Here’s what I did. With the flowers standing upright in each square, I drew the center diagonal line from the lower left corner to the upper right corner on 1/4 quarter of the square blocks, and then from lower right corner to upper left corner on another 1/4 of the squares.

THEN I flipped the remaining half of the blocks upside down so that the flower stems were at the top of each block. Then I drew my center lines the same way as above.

And it worked. All the flowers were facing upright. I sorted the blocks into the four groups and that made assembling the quilt easy. Each block was either dark upper quadrant left, dark upper quadrant right, dark lower quadrant left or dark lower quadrant right.

However, I did make an error sewing my strips together. Instead of sewing block to block across the strip, I sewed them in pairs. I accidentally flipped one of the pairs upside down in one row. The pattern was correct, but in those two blocks, the flowers are upside down. Oops!!

The quilt was fully assembled and I was sandwiching the layers of the quilt when I saw what had happened. I thought about taking it all apart, but then decided that since with this busy floral fabric, it just wasn’t that noticeable. And left as is, it’s a teachable moment. See if you can find the upside flowers! (I’m not telling)!!

If I were making this quilt again, I would probably tone it down! (It is busy, busy, busy!! But fun)! There is a lovely light green fabric with dark green dots in the “Sunny Fields” line. I would use that with one of the sunflower fabrics in the half square triangles and use the butterflies as the border.

But I do like this quilt as is. It’s the quilt you’ll want to grab if you need to stay AWAKE! Not the one you should choose for a nap!

Here’s the back.

Back of the quilt.

Back of the quilt.

TAGS: Fabric Café® "Kaleidoscope" pattern, Half Square Triangle quilt, Sewing half square triangles with a directional fabric


September 10, 2020

"Tula's True Colors" 3 yard Fabric Café® "Attraction" Quilt is Complete

by Judy Tucker


“Tula’s True Colors” made with the Fabric Café® 3 yard quilt pattern “Attraction”,  41 1/2 x 59 inches

“Tula’s True Colors” made with the Fabric Café® 3 yard quilt pattern “Attraction”, 41 1/2 x 59 inches

“Tula’s True Colors” made with the Fabric Café® 3 yard quilt pattern “Attraction”,  41 1/2 x 59 inches

“Tula’s True Colors” made with the Fabric Café® 3 yard quilt pattern “Attraction”, 41 1/2 x 59 inches

The aqua fabric in “Tula’s True Colors” by Free Spirit has a design that looks like a mineral that has been in cross section. In fact this fabric design is called “Mineral”. So I took my quilt over the local conservation land to take a photo of it on some big rocks left behind at some point by a glacier.

This pattern is “Attraction”, one of Fabric Café’s® three yard patterns. All of the fabrics on the front of the quilt, except the binding, are from Tula Pink’s “Tula’s True Colors” printed by Free Spirit.

Here is the back. I found it in my stash after I decided that the fabric which I had ordered just wasn’t right for this quilt. Go figure! The backing fabric is called “Nature Walk”, designed by Tamara Kate for Michael Miller Fabrics. It has rabbits, squirrels, butterflies and mushrooms in a diamond grid. It makes a perfect back for this quilt. (This is an old fabric line, mostly out of stock, but you might find a bit our there if you search).

Backof"Tula'sTureColors"FabricCaféquilt.jpg

The quilting was all done on my domestic machine with a walking foot. It is such a linear quilt pattern that I just followed its lead and did straight line quilting, just beside the ditch.

I’ve entered this quilt in Bits ‘n Pieces Quilt Shop’s Customer 3 Yard Quilt Challenge. All the quilt will go up on their FaceBook page after September 12th. You’ll be able to see all the entries and vote on your favorites. Go check it out this weekend—it’ll be fun!

TAGS: Quilt Using "Tula's True Colors" by Free Spirit, Fabric Café quilt pattern "Attraction", Three Yard Quilt Pattern


September 3, 2020

Peg Butterflies

by Judy Tucker


Peg Doll Butterflies

Peg Doll Butterflies

Peg Doll Butterflies

Peg Doll Butterflies

I was wondering what to do with the little wood peg bunting baby or bee pegs which I purchased from A Child's Dream a while back. Bees were the obvious choice but because I planned to make a mobile, I wanted something else. Butterflies!! That’s the perfect solution.

First I painted by body of each butterfly with a different color. The heads are all painted grey. After the paint dried, the wooden peg is sealed with bees wax polish.

The butterfly wings are cut out of wool felt to match (or coordinate with) the body of each butterfly.

Here are the two pattern pieces to make the top and bottom butterfly wings. Print the pattern at 100% and check the box on your printed pattern to make sure the 1 inch box measures 1 inch.

This is what the pattern looks like. If you don’t have a printer, you can draw your own wings based on this picture.

PegButterflyWIngsPattern.jpg

To assemble the butterflies, cut a piece of perle cotton thread (or heavy thread) about 18 inches long. Tie a knot in the thread 3 inches from one end. You will need these 3 inches later to tie the thread around the neck of your butterfly.

Match up the two pattern pieces so that the bottom wings are UNDER the top wings, aligning the flat edge with the upper notch of the top butter fly wings.

Using your thread, sew the two sets of wings together, starting at the upper notch on the top set of butterfly wings. You can use a simple straight stitch or any embroidery stitch you want to use. I did both straight stitches and French knots.

TopsOfPEgButterflyWings.jpg

When you have sewn the wings together, run your needle through the bottom layer to felt and bring the needle back up to the top layer, next to your first stitch.

Tie the thread, around the butterfly’s neck, using the loose 3 inches of thread. Make sure you have a tight knot. The take the long thread, still threaded on the needle, back under the butterfly wings and come up in the middle of the top set of wings. You will use this thread to hang up your butterfly. Tie a knot in the far end of the thread you will use to hang up your butterfly. That will keep it from unraveling.

Trim off the excess piece of thread under the butterfly’s neck.

Well done! Have fun with your new butterflies!

In the garden with the marigolds

In the garden with the marigolds

SAFETY NOTE: No NOT give these peg doll butterflies to a child under age 3 years. They are a choking hazard.

Notice: This blog is not monetized: I do not use affiliate links. When there are links in a post, they are to give credit to another creative person, because I like or have used a product, or to help the reader easily find supplies for a project.

TAGS: Peg Doll Butterflies, Peg Dolls, Wooden Peg Dolls


  • Newer
  • Older

Powered by Squarespace 7